Showing posts with label behind the scenes. Show all posts

09 December 2014

On My Workdesk Wednesday #5

This is WOYWW #287 (and the fifth time I've participated) and if you want to see the workdesks of other artists and crafters, check out the linky here!

Well, my friends, this semester has been a doozy. When I wasn't in class for 27 hours (per week), I was working on hours upon hours of homework, working on custom orders for my Shoppe, going to bible study or other meetings, and somewhere in there trying to fit in as much of a social life as I could. Oh, yes, and eating, sleeping, and exercising. Priorities.

Needless to say, I don't plan on taking an overload semester again anytime soon. Next semester will only be 15 credit hours. Right now it is finals week, I am delaying on studying for calculus, and I really just want to be home enjoying Christmas break and getting the time and freedom to make some fun art.

For today's "What's On Your Workbench," I am going to share some pictures from the past several weeks!

So, this is a slightly random sampling of what my workspaces have looked like this semester.


Probably one of the most interesting things I had on my desk was the pinecone collection that I scavenged from the trees around campus...


This was when I was watching Anastasia while cutting up the pinecones and gluing them onto copper.


And THIS is why my roommate and suitemates are fantastic people. Well-- one of many reasons. They don't kill me when I take over our table with my wire and beads (and pinecones)!

All three of these pictures are from one project for my Shoppe-- a custom bridal "Entwife Woodland Circlet" inspired by the circlet I made a couple of years ago. I will be blogging about this piece sometime soon. Here's a couple of pictures of the finished circlet:


Another incongruous sight for a dorm desk:


(Well, I would imagine that the face of John Green isn't too incongruous. Same with the calculator and tea. However I think that the metalwork tools are.)

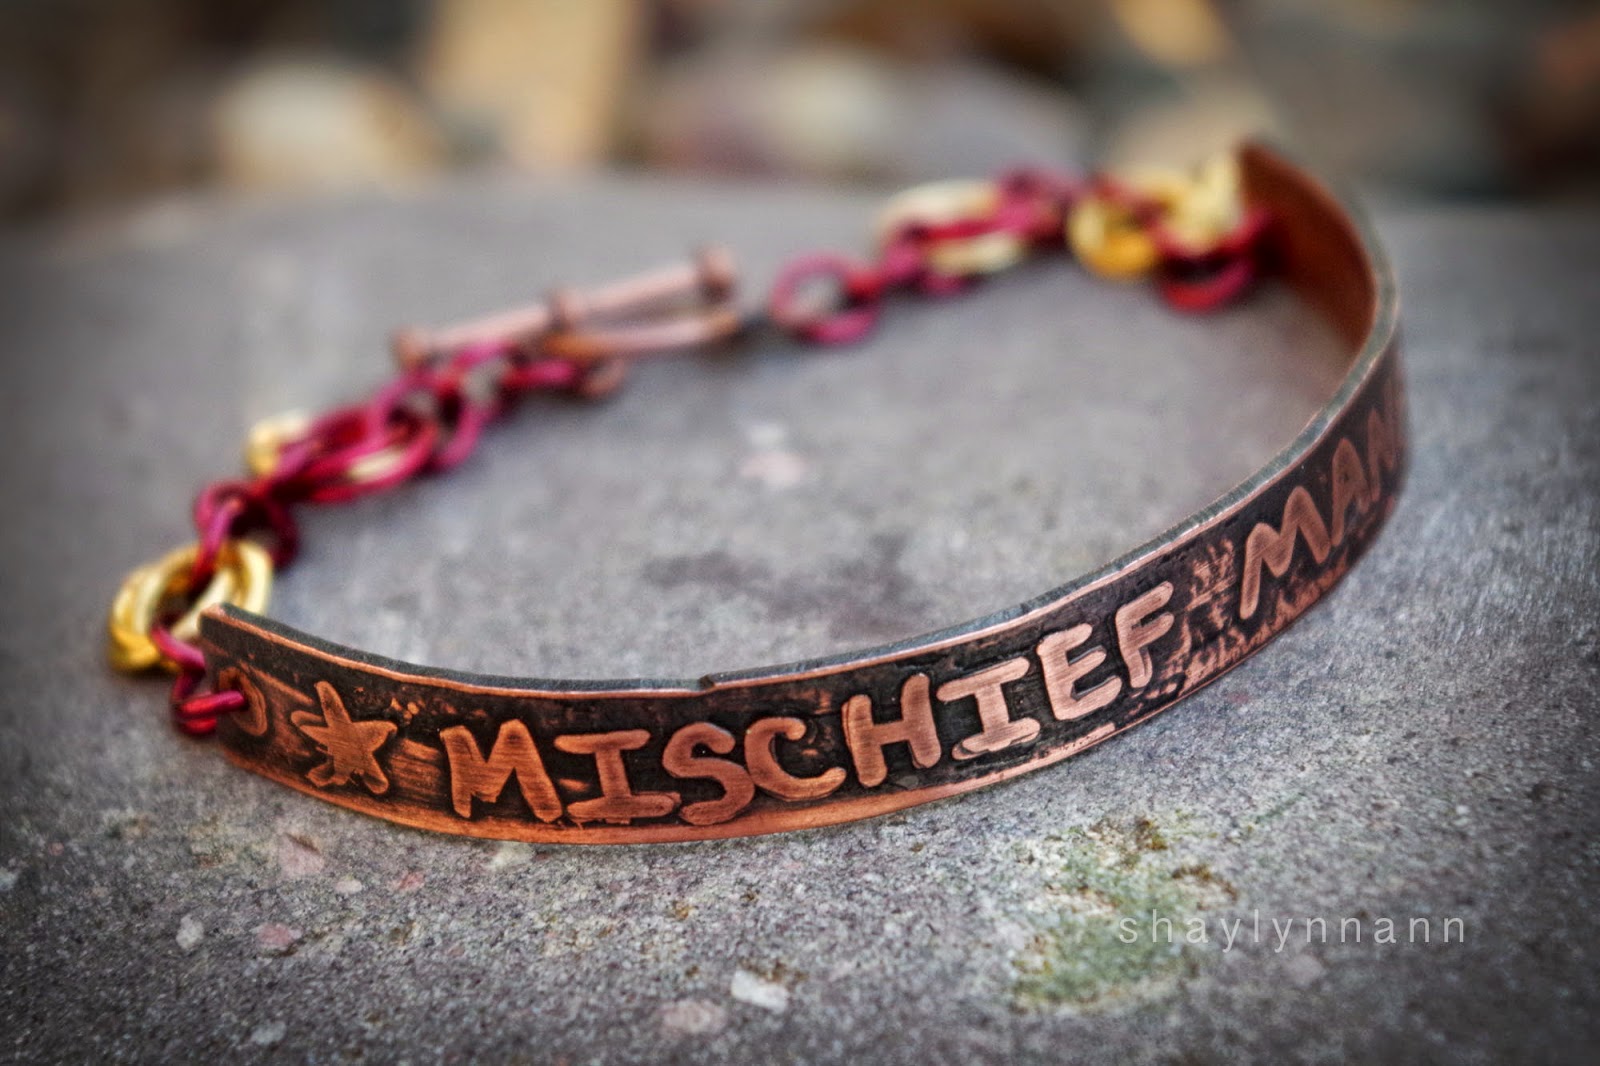
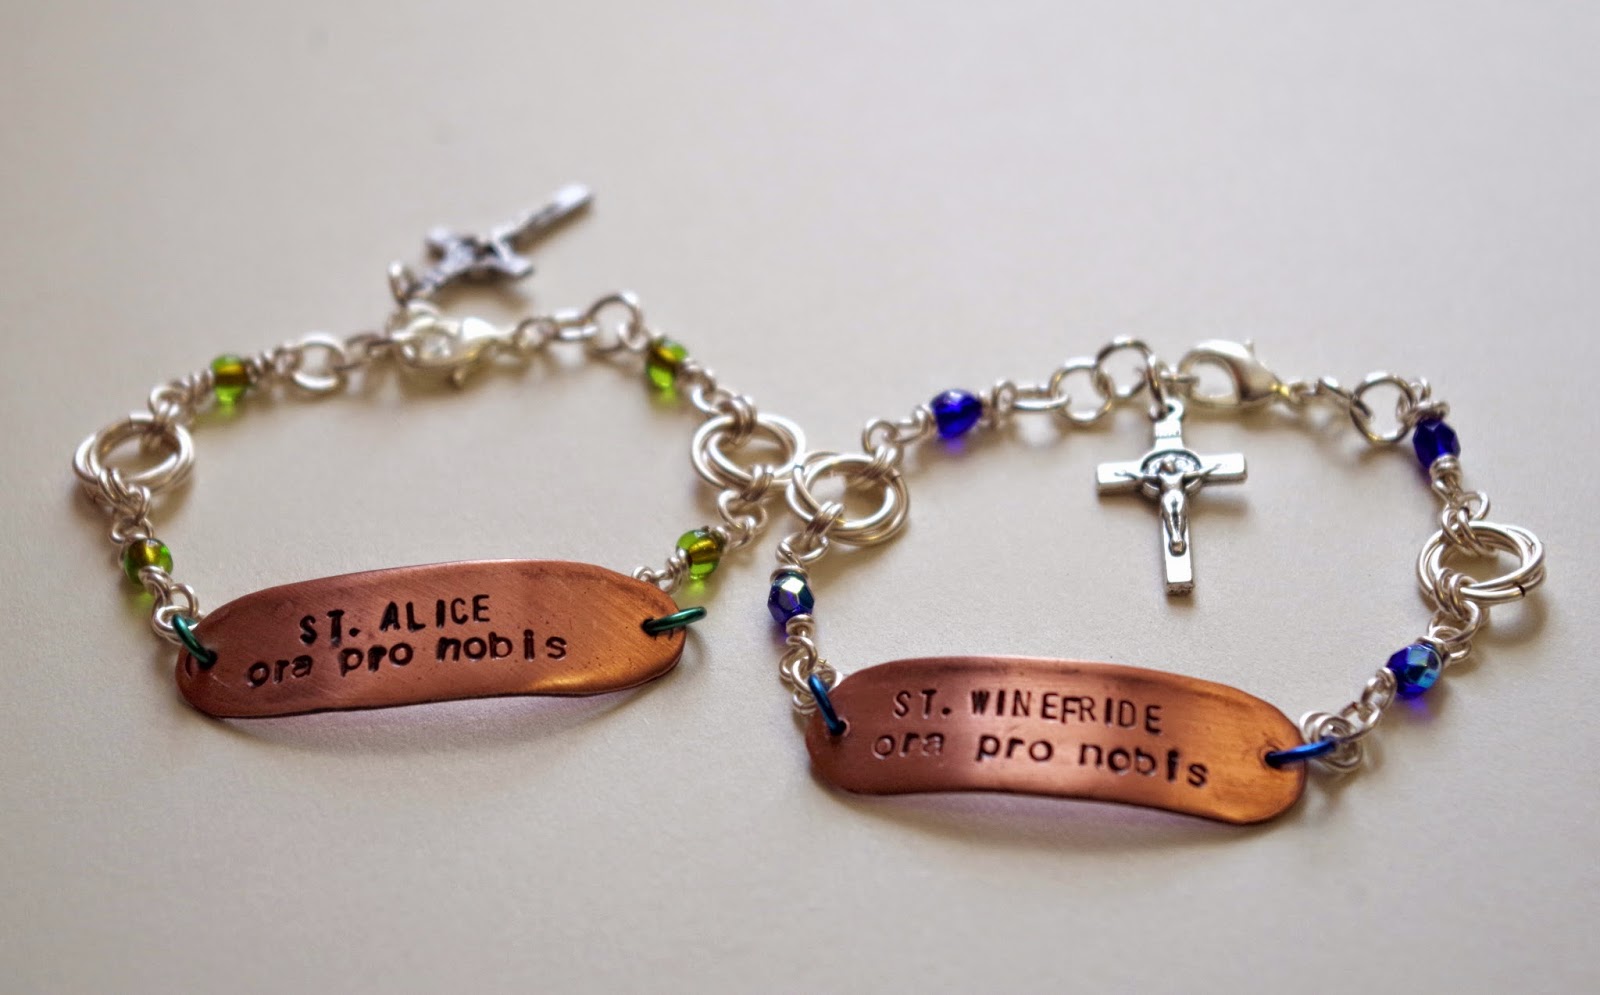
This was, again, for my Shoppe. I was stamping quotes on sheet metal, which I then sawed out (yes I was careful with the dorm furniture, mom, I am not five years old! lol!). Our priest at our campus ministry let me work with my chemicals in the church's backyard. I was using Liver of Sulfur to darken the letters and then a resin spray to seal it.


Here's some of what came from this batch of metal:


This is a picture from the classroom of my favorite class of the semester: Color Theory. A very sweet, classy, excited Polish lady taught the class. I found good friends among my classmates and am very sad that it is officially over (I had my final on Monday).


It's so much fun to be an art student, lugging up a summer's worth of money in paints and supplies up flights of stairs every day. Oh so much fun. But (very nonsarcastically) completely worth it for this class.

I'm not sure what project I was working on in this picture below, but I think I was braiding wire for circlets.


This is the only in-progress shot I can find of the bridal party jewelry I made for an autumn wedding.


These are more workdesk shots from my color theory class:


And THIS lovely shot is not of my dorm desk, or a workspace in one of my classrooms. It is the kitchen table at home, from the one day during Fall Break when I worked on homework for eleven hours and drank an entire kettle of peppermint tea:

(Picture from my Instagram)

The following three pictures are from my dorm desk when I was working on more projects for Color Theory. I didn't take many pictures of my design classes-- mostly because I did not enjoy them very much. Don't get me wrong, I love the subject matter and still plan on majoring in Graphic Design-- but it is amazing how much mediocre teachers and projects can try your patience.


This project pictured below is, weirdly enough, from a design class! We had to create a piece of art based on a list of mashups our GA gave us. My piece is a mashup of M.C. Escher ("Print Gallery") and Frank Lloyd Wright ("Fallingwater").


We were given the assignment on the Monday before finals week and it was due by our Saturday final. I got so into it that I actually finished three days early. What is this.


And what is on my workdesk THIS week?


A mess.

To be fair, I am both packing and studying.


Anyway, there you go, my friends! Please believe me when I say that this whirlwind is just a very small snapshot of all the craziness that has been going on in my life this last semester. :)

I'm off to study for my last three finals, but as soon as I am ready for a study break, I'm going to check out the workspaces of everyone else involved in "What's On Your Workdesk Wednesday"! So should you, if you can. There are some creative people participating in WOYWW.

06 August 2014

On My Workdesk Wednesday #3

This is WOYWW #270 (and the third time I've participated) and if you want to see the workdesks of other artists and crafters, check out the linky here!


My workdesk this week is once again the dining room table. Last week, I was making new graphics for my blog and editing photos. I've still been doing that, but a couple days ago I had some beautiful free-time to spend painting.

The picture above shows the very start of a drawing that I inked and watercolored. I'm still working on getting a blog post up about it, but for the meantime, here's a progress picture from my Instagram:


Whoah, Instagram pictures look weird when they aren't two inches big on your phone!

The painting is an illuminated-style illustration of some quotes in The Silmarillion (the history and mythology of the world that The Lord of the Rings takes place in). The whole theme of the piece is about how much the Elves love starlight. 

I've haven't only painted this week, but I haven't been as productive as I want. I'm actually writing this post on Tuesday night because all of tomorrow (Wednesday) is going to be spent in the studio.

Tomorrow is my last full day to spend in the studio before I leave for school.

I'm excited for another year at college but so sad that my summer is nearly over. I've been busy, and also took two summer courses, and time really flies.

Anyway, my point was that as of Tuesday I don't have a picture of my real workdesk. I'll try to update this post with a snapshot at the end of the day on Wednesday. But I do have a picture of a piece of jewelry that I made for someone who wanted a black-and-white medieval-style necklace featuring the Evenstar pendant. She is doing a cosplay of Lyanna Stark from Game of Thrones.

Here's what I came up with (pic from Instagram):


I really enjoyed making this necklace-- I just kicked back and listened to Goose Girl by Shannon Hale (fantastic YA fantasy novel to listen to, it was interesting and didn't require much concentration) and played with beads and wire for a couple hours.

So... This has been a peek into what I've been working on since last Workdesk Wednesday. I'm looking forward to glancing at everyone else's blog and seeing their workspaces later this week!

16 June 2014

The Making of Hand Drawn Copper Jewelry

Today I finished listing some new jewelry in my Shoppe that I am honestly very proud of. Making these copper components was one of the most complicated jewelry-making processes I've ever attempted. This was also my first first non-class project with a jeweler's saw (I took a Metals 1 course last semester, which I will be blogging about in two or three days!). Altogether the jewelry took a full workday to complete and photograph.

This isn't a tutorial so much as just an overview of what I did to make these pieces, but if you have any questions about the process feel free to ask in the comments or via email and I can explain in more depth.

(While I occasionally do use store-bought pendants in my jewelry, it's projects like this that make me want to laugh when people ask where I buy all my jewelry parts from. Thankfully I don't because that would be rude, but it's lots of fun to explain the processes!)


I started with a sheet of solid 18 ga copper and drew the designs I wanted to make with Sharpie.


The next step was sawing out all the individual pieces, bit by bit, completely by hand. 


I managed to break three saw blades and then break the fragments which I was still using to saw. I'm not particularly proud of that; my sawing technique needs a lot of help.

The bench pin I am working at is made out of pine. I simply cut out a v-notch and clamped it to my workbench. The yellow and black thing you see on the right of the picture is beeswax. I originally bought it for my pysanky egg-decorating, but it works pretty well for conditioning the saw blades.


At this point the pieces looked like this. (For those who don't get the reference, "OKAY" is an important line in The Fault in Our Stars by John Green. The movie just came out and, of course, my cheeks turned into rivers and the shoulders of my tshirt into overtaxed sponges. The story is so sad and so beautiful.)


Next, I etched the designs.

Sharpie works as a resist, so everywhere that I drew with Sharpie remained raised and everywhere else got eaten away by the Ferric Chloride acid. After soaking the copper in the acid bath I neutralized it in a solution of baking soda and warm water. To be on the safe side, after that, I dusted pure baking soda onto the dried-off copper and rinsed it off.


Copper looks like this after etching. It's not much until you attack it with steel wool.


You can't imagined out relieved and excited I was that this actually worked well!

The raised designs weren't very obvious, so the next step was oxidizing the metal!

I used my metal/leather hole puncher to punch the pieces (so I could string them on thin copper wire so  they wouldn't be so difficult to remove from the acid bath-- I learned that the hard way with the ferric chloride) and, wearing gloves, thoroughly scrubbed the pieces to remove debris and fingerprint oils.

(Fixing a the broken schnozzel for my hole puncher wasn't fun. I mostly bring this up because I love the word schnozzel. SCHNOZZEL.)


Then I prepared a Liver of Sulfur bath. This stuff smells like... well, sulfur. The rotten-egg variety of sulfur scent, to be more accurate. BLECH.


After neutralizing and cleaning, the copper is basically just black. Then I begin the process of very gently brushing with steel wool and polishing with three different grades of sandpaper. After a while, the raised designs are shiny and the recesses are dark brown or black (depending on how long I had them in the LOS).


Next, I filed and then sanded the edges. Sawing metal can create lots of nicks. You definitely don't want them catching on your skin, so I file every single edge. The sanding is to create a smooth, even shine on the surface of the copper.


Some of the pieces required more sawing at this point. The Celtic trinity knot was saw pierced, a process that lets me meticulously cut shapes out of the inside of a metal design. The new edges were filed and sanded, too.

I then used a spray called ProtectaClear (a body-salt resistant resin) to seal the oxidation and ensure that the nice polished raised designs won't naturally oxidize over time.

(Raw copper pieces-- like all of the copper wireworking I've done in the past-- naturally reacts with oxygen and turns dark brown over several months. A gently scrub with vinegar brings back the fresh, shiny copper).

One of the best things about the spray is that is keeps your skin from turning green! The greenness is not actually an allergic reaction, as I was taught growing up. It actually is a chemical reaction very akin to oxidation (the reason that pennies turn brown then green) and is just a buildup of molecules that washes right off the skin with soap. It's never a fun thing to deal with, though, which is why I am so fond of this spray. It's nontoxic, don't worry. :)


I used a dapping block on this small pendent to dome one of the pieces.

I haven't finished it yet but I'm doing another piece that is purely saw work with no etching or oxidizing.


The next several hours were spent doing techniques I am far more familiar with: beading and wireworking.

The results?


This "Mischief Managed" bracelet is inspired by the Marauder's Map in "Harry Potter" and has chainmaille in Gryffindor colors.


The bold, fantasical swirly thing bracelet (I literally can't come up with a nice, catchy, cheesy name for it-- sometimes coming up with names for pieces when listing them is really hard), modelled by my little sister.


 Medieval Swirl Hair Fork-- the front design was inspired by some circular knotwork I saw in some medieval manuscripts I was studying. Yes I do that. Yes it is fun. Some of the artwork in old manuscripts is beyond amazing.


The Fault in Our Stars inspired necklace-- the iconic "OKAY".


Another piece difficult to name-- "Etched Leaf Pendant" which is this cool fern-like leaf design that I use in a lot of my drawings.


Another TFIOS necklace-- "Okay? Okay. Necklace"


Triquetra (or "Trinity Knot") necklace.

I am SO BEYOND EXCITED about this technique, even though it's crazy complicated. The possibilities are well nigh endless!!!!!!!

That being said, what do you think I should make? I am looking for ideas because when I try coming up with ideas on my own I get so many that I can never narrow in and decide and can thus wind up using none of my ideas!

  • bgbgb