I actually made this circlet last fall. Way to take forever posting... :)
Roses for my sister, Princess Rose... She loved dressing up for these pictures!
The roses are actually Sculpey clay. The two little rosettes in the back were actually pressed into the wire, and I then baked the entire back piece of the circlet. (The circlet has two parts-- a front and a back-- which I attached to each other.)
I baked the pretty "purpled" roses separately. I attached them to the front peice by twisting the wire (see the picture above). I followed AlleyCatScratch's how-to-make-a-clay-rosette examples.
By the way, the purple circles are inspired by Arwen's Hair Jewel she wore with her Bridge Dress in The Lord of the Rings. Can you tell I am a LotR geek? I mean, AlleyCatScratch has the absolute best LotR costume research and make-it-yourself ideas on the Web... but no one in their right mind would call their site easy to navigate!
Adelynn's hair is so beautiful and long. It gets in her way in gymnastics but is so princess-y.
She loves her circlet. ^_^
Showing posts with label clay. Show all posts
09 September 2010
14 March 2010
Fun and Useful Pens
What you will need:
A Bic pen, or similar pen with a removable ink/tip. Do not use a hard plastic one; it combusts
Sculpey clay
Clay tools (toothpick, hands, etc)
Oven
What you do:
Remove the ink/nib from the pen. You don't want that exploding in the oven!
Decorate your pen with sculpey clay
Make a "holder." Use the pen to shape it, but make the whole extra-big, twice the size as needed.
Bake according to clay instructions
Cool
Put some unbaked clay into the "holder's" hole. That will let the pen stay put much better.
Insert the ink again
Use until your ink runs out; pull out ink and put more in!
These pens are remarkably sturdy. I've made around ten of them; the three above are the ones I haven't given away. The pen on the far left was my first ever. I made it five years ago, and its still holding up. It has a slight crack because I put a chair leg ontop of it one time, but still works. The middle was about three years ago, and I just made the right one a few months ago. Its much prettier than the picture makes it look.
A Bic pen, or similar pen with a removable ink/tip. Do not use a hard plastic one; it combusts
Sculpey clay
Clay tools (toothpick, hands, etc)
Oven
What you do:
Remove the ink/nib from the pen. You don't want that exploding in the oven!
Decorate your pen with sculpey clay
Make a "holder." Use the pen to shape it, but make the whole extra-big, twice the size as needed.
Bake according to clay instructions
Cool
Put some unbaked clay into the "holder's" hole. That will let the pen stay put much better.
Insert the ink again
Use until your ink runs out; pull out ink and put more in!
These pens are remarkably sturdy. I've made around ten of them; the three above are the ones I haven't given away. The pen on the far left was my first ever. I made it five years ago, and its still holding up. It has a slight crack because I put a chair leg ontop of it one time, but still works. The middle was about three years ago, and I just made the right one a few months ago. Its much prettier than the picture makes it look.
02 March 2010
Elvish Clay
In addition to the clay Gold Evenstar, I have made several other Elvish clay creations based on the Lord of the Rings movies. To make these, all you need is some Sculpey clay.
To make your thinner clay creations sturdier, paint over the peice with Mod Podge or another kind of glue. This will also work extremely well for gluing broken creations back together. My two year old brother smashed all of these pictured into at least three separate parts. Two coats of Mod Podge later, and you can't hardly tell they were broken. Also, for a more metallic, realistic look, coat with a glaze. I wore my Chase Buckle to a dance, and everyone thought it was metal and that I had bought it!
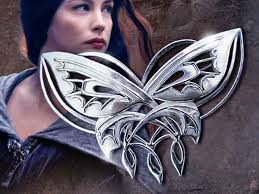
Arwen wore a butterfly brooch as a clasp on one of her many capes. I made my own version by rolling out the clay, using a toothpick to cut apart the main pieces (the wings, etc), rolled up bits for the antenna and swirlies at the bottom, and used a toothpick to carve the designs on the wings. Mine is two inches wide.

Galadriel wore a beautiful, intricate silver and mother-of-pearl brooch. Mine is all clay! I used the same techniques as above.
Arwen wore this brooch (or is it a buckle? It is hard
to tell) on her Chase outfit. It was definitely confusing-- I realized that there are four "petals", two "leaves" and two "stems", with ends intricately wrapped and twisted around each other. My only suggestion, should you choose to attempt this, is to pay very close attention to the picture.
Now, this one didn't turn out so great. I have been using the pictures that came in a little booklet inside our Lord of the Rings DVD. You know, the ones where they try to sell you all the coolest, most expensive trinkets related to the movies? This was called the "Eternal Star" or something. I couldn't find the same picture online. I spiced up the clay with some beads.
There you go! My adventures with clay... and being a total Lord of the Rings geek. :)
To make your thinner clay creations sturdier, paint over the peice with Mod Podge or another kind of glue. This will also work extremely well for gluing broken creations back together. My two year old brother smashed all of these pictured into at least three separate parts. Two coats of Mod Podge later, and you can't hardly tell they were broken. Also, for a more metallic, realistic look, coat with a glaze. I wore my Chase Buckle to a dance, and everyone thought it was metal and that I had bought it!
![]() |
| My brooch out of Sculpey clay |
| The brooch as sold by Noble Collection |
![]() |
| My simplified version of Galadriel's brooch |
Galadriel wore a beautiful, intricate silver and mother-of-pearl brooch. Mine is all clay! I used the same techniques as above.
![]() |
| My version |
Arwen wore this brooch (or is it a buckle? It is hard
to tell) on her Chase outfit. It was definitely confusing-- I realized that there are four "petals", two "leaves" and two "stems", with ends intricately wrapped and twisted around each other. My only suggestion, should you choose to attempt this, is to pay very close attention to the picture.
![]() |
| My Eternal Star, a failure in my opinion... |
| As sold by Tolkien Town |
Now, this one didn't turn out so great. I have been using the pictures that came in a little booklet inside our Lord of the Rings DVD. You know, the ones where they try to sell you all the coolest, most expensive trinkets related to the movies? This was called the "Eternal Star" or something. I couldn't find the same picture online. I spiced up the clay with some beads.
There you go! My adventures with clay... and being a total Lord of the Rings geek. :)
14 February 2010
Some Jewelry
I am doing a Valentine's Day swap with some members of my fourm; I went overboard and took it as an excuse to make a bunch of little crafts... Not even related to Valentine's Day. :) I think I put most of them in that picture of random recent crafts on this post. Some of these things are for the swap.
Here you can see three rings that I made. I really can't give instructions because I made it up as I went along.
Gimli's axe is made out of Scupley clay. I cut it with a toothpick.
Here you can see three rings that I made. I really can't give instructions because I made it up as I went along.
Gimli's axe is made out of Scupley clay. I cut it with a toothpick.
Here are two more Washer Necklaces
Subscribe to:
Posts (Atom)
- bgbgb