Showing posts with label hair thingies. Show all posts

11 June 2014

How to Wear a Hair Fork (Part 1)


Last week, a friend of mine came over after work to go hiking at our house. Before we changed into workout clothes, I insisted she come into my studio and model for me "real quick."
I had just made a hair fork-- a decorative two-prong hair stick made out of copper-- and snagged a couple of pictures before we headed out. The next day, I shared the pictures on Tumblr and Facebook and uploaded it to my Etsy shoppe, and was greatly surprised by the response!

Over the past week I've made several more hair forks, all of which can be seen on my Etsy shop, or (if they sell), in my gallery of old items on Facebook.

I've come up with seven different hair styles using my hair forks! Below are five of them, along with video and picture tutorials. Tomorrow I'll post the final two!

When using a hair fork, remember that you weave them into your hair the same way that you weave in a hair stick or a hair fork: push backwards on the bun, switch to font, and then wiggle it up to the middle of the bun then switch to wiggle it down by your scalp. (If that made no sense, watch the first video!).

If you use a hair fork (whether mine or one you already have) and do these hairstyles or come up with another, feel free to share pictures in the comments or by emailing me! I might do a little gallery of the pictures! :)

(P.S. Scroll to the bottom for free shipping on any hair forks through 6.20.14!)


Click "READ MORE" to see 5 ways to wear a hair fork!

(Hair forks pictured above: Woodland Green Hair Fork Set and Purple and Gold Twilight Hair Fork. Hair fork used in the video: Purple and Gold Twilight Hair Fork).


The Twist Bun is the easiest hairstyle to do!

I started with an accent braid on the side, but you can do the bun without any braids at all, of course!

1. Hold your hair as if you were going to make a ponytail.

2. Twist your hair tightly.

3. Coil your hair around and tuck the ends under.

4. Push in the hair fork. Insert in the bun and push it out.

5. Weave the hair fork the other way and push it through the bun.

6. Ta-da! A finished twist braid! It will stay in all day!

________________________________


(Hair forks pictured above: Midnight Blue Celtic Knot Hair Fork and Woodland Green Hair Fork Set . Used in video: Woodland Green Hair Fork Set . Used in video on the variation hairstyle: Copper Celtic Knot Hair Fork.).


Braided Twist Bun

1. Make a low braid at the nape of your neck.

2. Coil like a twist bun and insert your hair fork.


3. Enjoy your deceptively fancy-looking bun! 
________________________________

Braided Twist Bun Variation: Side Braid

1. (Optional). Part your hair on the side. Starting at the part, twist your hair up in sections. The twist should wrap around the back of your head.


2. Make a side braid. In this case, I did a rope braid.


3. Coil the braid into a twist bun right by your ear.


4. Insert the hair stick! :)

________________________________


(Pictured above and used in video: Blue Spiral Hair Fork. Used in variation: Woodland Green Hair Fork Set.)


Half-up Hairstyle


Honestly this one doesn't need much of a tutorial. Just separate the top half of your hair and make a basic twist bun!
________________________________

Half-up Hairstyle Variation

1. This was made up on the spot, so it's a bit different. Start with a half-up twist bun. Braid the bottom part of your hair, at the nape of your neck OR at the side of the nape of your neck like I did.


2. Wrap the braid around the original bun.


3. Insert another hair fork, or secure the braid with a bobby pin.


(For those who are interested, you can get free shipping on your entire order from my etsy Shoppe if you include a hair fork in your order! Use this coupon code at checkout: HAIRFORKSHIPPING2014 It is good until June 20th, 2014).

11 April 2011

Mine, My Own, My Precious

Just a quickie post today. Sorry!


A few weeks ago, I made a little hair clip for a St. Patrick's Day English Country Dance. The dance was snowed out, but I've still been putting this hair clip to good use!

All I did was sew some fake leaves and the most awesome button ever onto a hair clip. I'm planning on using that button for a craft in the future, but for now, it makes one pretty hair flower. :)

P.S. Excuse the blech pictures. That's what I get for snapping them in the bathroom after a long day!

P.P.S. I'm still on the lookout for guest bloggers!

P.P.S. I do have about fifteen or so projects that I've worked on. All will be rather big posts. :) Unfortunately, you'll have to wait until after Easter!

P.P.P.S. and Kind of Random: I broke my first board yesterday, with a flying sidekick! Our Taekwando group did a demo for Fr. Leo's talk (which was amazing, he is a truly dynamic priest and boy his food is yummie).
I'm kind of mad at myself, because I wasn't able to break the board at the demo, but I did do it afterwards! Haha, when I actually broke it I'd changed out of my uniform and was wearing a skirt and leggings. What can I say, I'm a tomboy in skirts.

08 November 2010

Faerie Hair Clips


Here are some more fairy hair clips that I have made!


Click to enlarge

They took forever but are so fun.

I used up every clippie I owned-- and some of my sister's, too. :)

As I mentioned in a recent post, I am going to make a "gallery" of each design on that design's page, in order to keep my blog from being uber cluttered. 

Here is the gallery of "Fairy Hair Clips." Check back often for new clips! 

If I ever do a tutorial on this, it will be found on this page.

My original hair clip. See my old blog post HERE.
And again.

The second hair clip. See it's old post HERE.


14 February 2010

Faerie Hair Clip

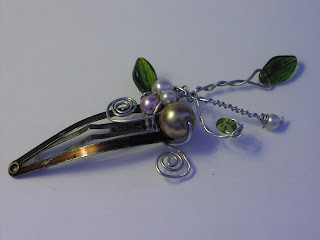
Another hair clip, made from beads and wire tightly twisted around a hair clip.

It was very difficult to wrap the wire around the clip so that it stays in place. I used floral (thin) wire, and wrapped it around my loops and beads, which were done with an 18 or 20 guage wire (I forgot). Remember: a good pair of pliers are your best friend!

EDIT:
Here is a much better picture of my first Elvish hair clip: 


SEE ALSO:

More Hair Clips

And this is featured in my posts:
Masquerade Costume
Shadow of the Bear Artfire

19 September 2009

A Necklace and a Hair Thing

More pictures of stuff I made! A butterfly neecklace and an Elvish hair clip.


This is the butterfly necklace. I used floral wire and seed beads to make the butterfly. I used these instructions to make the beaded chains that attach the butterfly to the colored hemp cord. For a clasp I made my own jump ring and S hook.

 
The hair clip! Perfect to go with an Elvish or fairy costume! Now, if only I had one of those... :) The leaves are Czeck glass. Basically I just took some 20 ga and floral wire, twisted some beads in it, and tied it onto the clip.

13 September 2009

Imported from my blog... first attempts at Elvish jewelry!

EDIT: I've since made many, many more Elvish jewelries! 
In fact, almost half the jewelry featured on this blog are Elvish. 
I've got several tutorials (with more coming!) and I sell some on my { Artfire shoppe! }


Elvish style jewlery

So... I have always loved the clothing and jewelry in The Lord of the Rings, Narnia, and other movies similar to those. I've always especially loved the Elven style. I fact, I love everything Elvish. I am hoping to make an Elven dress if we can get the supplies. It would be blue and silver... Anyway, I have always wanted Elvish style jewelry. Way back in 5th grade, I got an Evenstar necklace (for $3, when it normally was $10!)


(It's not as nice as this one- this is the "official" $100 diamond one)


I also love "medieval" "fairy" or "Celtic" style jewlery, which I dub as "Elven" since it really looks alot like it. :)


Since it is virtually impossible to find anything like this in Rolla, and even if you did, it would probably be very expensive, I decided I would try to make some for myself. I HATE WAL-MART. Let me say that again: I HATE WAL-MART. They took away 3/4 of their fabric, but their worst transgression is the fact that they have deprived their art section of anything of worth. Once upon a time you could find beads and wire, embroderiy floss, random craft sets, paints of all kinds, etc. Now all you can find are: premade bead necklaces, some scrapbook supplies, cheap kids crafts sets, and wedding decorations. I HATE WAL-MART.

To get to my point: There are no other craft supply/hobby stores in Rolla that I know of. (Unless you count that moldy one downtown). I had to deal with a small Ziplock baggie of leftover beads from old projects and thin floral wire. At a garage sale I found a small spool of thicker wire, but I already use it up in these projects... Dad had a pair of needlenose pliars that are really helpful.

My first attempt that didn't fall apart:

 
I was actually fairly proud of this next creation. I'm calling it an ear cuff. Sounds funny, I know, but what else should I call it?

Here is how it is worn:
(random girly thing- my hair looks curly in that picture! And not super frizzy... :P)
I think you would probably only wear one of these, and you can wear earrings with it, too.

I made these before I made the ear cuff I made "earrings" for Adelynn. She simply loves dress up and has been deploring the fact that her ears aren't peirced (keep delporing for 5 more years, Rosie!)

 
I also made a rock necklace:


This was laying on my desk, and so I just had to take a picture of it. I can't claim credit for this one: Rebecca made it. :)


Maybe next time I should lay a piece of white paper underneath when I take the picture...
Enhanced by Zemanta

  • bgbgb