29 July 2011

DeviantArt

After being bugged... to death... (in a good way), by multiple friends...

I caved in!

Please visit my DeviantArt page at:


For those who don't know about DeviantArt, it's basically a huge networking website for artists. They can upload artwork, browse the work of thousands of other artists, get feedback, and much more. I'm still trying to get the hang of it, and only have about 15 pieces up artwork uploaded and another couple in the "scrapsbook."

(One thing I'll add-- you probably don't want to browse the site at large via the search box unless you have the "mature content filter" turned on. I prefer to do my random browsing by checking out my friends' "favorites," because they have both good taste and really good morals, lol!)

There's some artwork up on DeviantArt that's brand-new, like this Art Nouveau Mermaid fresh out of my sketchbook!

If YOU have a DeviantArt account, please let me know! I'd love to check out my readers' galleries. :)

27 July 2011

The Dragon's Treasure Chest

A red flower necklace-- perhaps brought to life by an Autumn Fairy? Handmade, of course, by moi. :)

Fair maidens dwell in fairytales. So do chivalrous knights, courageous children, evil monsters, magical creatures, and treasure chests. It's a world full of marvels, and once we've come out and returned to the real world, the stories remind us that every real thing is in itself a wonder and a marvel.

This post isn't supposed to be a rambling on the land of Faerie, however. I just wanted to let you know that I have made many new pieces of jewelry!

My last "big batch of jewelry" post was inspired by everything Elvish. This batch comes to you straight out of the dragon's treasure trove. Most were inspired by fairytales!

These jewels all have that touch of whimsy that will bring the sparkle and marvel of the Land of Faerie into the Land of Earth.

Click for bigger images!


Blog readers may be familiar with this design-- it was my first attempt at some extremely complicated wirewrapping techniques. Named the Flower Garden, it was inspired by the sorts of gardens that are so beautiful you expect a fairy or a magical portal to appear!


edit: pink ones sold! I'll be making more!

Pixie Dust earrings! You can't go wrong with swirls of color and sparkling beads. :)

Another wirewrapped necklace. I could just see a mermaid or naiad wearing this... :)

And earrings to match. :) Oh, btw, what do you think about the earrings stand I made?


A royal necklace. Man, am I proud of this. :) Made with copper wire from A Beaded Affair. LOVE the wire. And having too much fun learning how to make filigree style necklaces!


Just another shot of the same necklace. :)

A snowflake set. I was actually inspired to make this after re-watching Tilda Swinton play the White Witch in Narnia, The Lion, the Witch, and the Wardrobe. But don't worry. This jewelry set will not turn you into stone!

Another new technique! This filigree beaded necklace is made with copper wire that I carefully twisted and twisted around on a jig. It's surprising how much wire and time it took-- but I think I need to do more like this. It was so much fun to make.

Another Fairy Garden necklace-- only this one is made entirely out of copper and green glass beads.

Some leafy earrings that remind me of Mirkwood from LotR.

A seashell swirl pendant! I think it must have washed up on a beach... perhaps a little peasant boy found it and it started a whole new adventure. (Can you tell that I like making up stories as I work on designing jewelry?)

So this one isn't exactly fairytale-ish. But it's chainmaille and its black and its cool. :)


You can't get more fairytale-ish than a royal circlet... but this headpiece can also be worn as a sparkling headband and would totally not look out of place with a modern outfit.

These silver-plated chainmaille earrings would go equally well with jeans and a t-shirt or a noble gown.

More long and slender Elvish earrings! I've made several of these in all sorts of colors. :) This one is hand-formed silver-plate wire and two deep purple leaf beads. The swirls could pass as music notes, too!


My workbench is full of many more things that still need the final tweaks before I get them uploaded. There should be a new batch coming soon!


Rivendell's Twilight

All of this jewelry is available in my Shoppe as well as being fairytale eye-candy for you today. I hope these designs made you smile!

(And perfect timing, too. Right now it's Christmas in July! The entire store is on a 10% off sale until the last day of July 2011!)


The Evenstar Set.

26 July 2011

Christmas in July!

Only 152 days until Christmas!

(Surely I'm not the only one who keeps track? LOL!)

Have a bit of Christmas in July! Shealynn's Faerie Shoppe on Artfire is currently running a 10% of sale!

New in the Shoppe-- Royal Necklace

That's 10% off EVERYTHING in the Shoppe!
(Except Elena's quilts)

Check it out-- there are many more things I have recently uploaded!

But hurry-- the sale is only through the end of July! That's 6 days...

ArtFire - Buy Handmade - Sell Handmade

Also, keep an eye out. I'll be doing a little promotion on one item each day-- you can get up to 25% off, or free shipping, or something along those lines!

25 July 2011

A Tour of my Sketchbooks, Part One

During our unpacking process, I found a veritable treasure trove: a cardboard box full of my old sketchbooks!

I know that many of my readers have requested to see more of my artwork, so I got this brilliant idea to share my sketchbooks with you. Yes, you read that correctly.


You get to see every last embarrassing sketch that I have hidden away in the depths of my spiral-bound, bent-paged books.


Now, the sketchbooks are obviously just small samples of the artwork that I did. At first, all of my art went into my sketchbooks-- but I tore out almost everything that turned out decent and gave them to friends and family as gifts. That means that you will only be seeing the not-so-decent drawings!

As I got older and more experienced, I started to do all of my planned works-of-art on separate paper. I also developed a bad habit of drawing on everything from napkins to schoolwork, so many of my sketches never found their way into these books.

And so, my sketchbooks truly are sketchbooks. They aren't glamorous. They are sometimes embarrassing, because I tend to use sketchbooks (rather than journals) to let loose when I am upset. Some of them cover over a year or even longer, reflecting periods when I wasn't focused on art... and others represent mere months. Most are somewhat lame, others positively exciting. :)

But they are my art. They are a part of me. You can see me grow as an artist. You can watch my tastes evolve (although I think that every one of my sketchbooks has at least one drawing of a fairy or princess... some things never change!).

I've been able to locate 9 sketchbooks, and plan on giving you tours on all of them. :) I might even pull out one of my folders full of random artwork.

I found that it would be much, much easier for me to take videos of my sketchbooks, rather than scan each page. As I said in the video, just leave a comment if you would like to see any particular drawing in greater detail. :D

(And excuse the accent at the very beginning. I was being silly!)

Enjoy the peek into my sketchbook!


P.S. Want to see more? As I post each new sketchbook, you will be able to find them on my YouTube channel, or right here on my blog under the label Sketchbook Tour!

P.P.S. I actually finished that sketchbook back in March or April. That's how long it took for the computer to get fixed so I could edit the video!!!

22 July 2011

My First Commissioned Artwork

A few weeks ago, I finished my first-ever commissioned work of art!


It is done in watercolor and a gray marker/pen.

The preliminary sketch
The painting is concept art for a friend who is writing a fantasy novel. I have to thank him for his patience while I tried to figure out how to draw something that is neither from my imagination nor from a photo. Doing artwork for others is hard work, lol!

In-progress painting
And in the process, I discovered that watercolors don't necessarily have to be my worst enemy. :)


-----
Just to let you know, if you are interested in commissioning a work of art, please email me at ShealynnsFaerieShoppe {at} gmail {dot} com!

As of right now, I am still trying to figure out if I would like to do much commissioning, and pinpointing pricing and required amounts of time, but I am more than happy to work with you and figure something out!

20 July 2011

Baby Quilts

My friend Elizabeth (aka Elenatintil), has baby-size quilts for sale! (They also work as lap quilts.)

I would love it if you would check them out! At $35 for a handmade quilt, they are hard to beat... and I can assure you that they are all made with lots of love! Plus, you get to help an amazing young woman fund her college education. :)

Don't forget to check out her blog at: Confessions of a Seamstress

Blue Stripes
Farmyard
Honeypot

Purple Butterflies
Cactus
Pink Power
DOLL QUILT $20-- Yellow and Green
UPDATE: SOLD right before I posted this blog post. :)

So, what are you waiting for? If you know anyone with a little one... or want a lap quilt... go and check them out!

19 July 2011

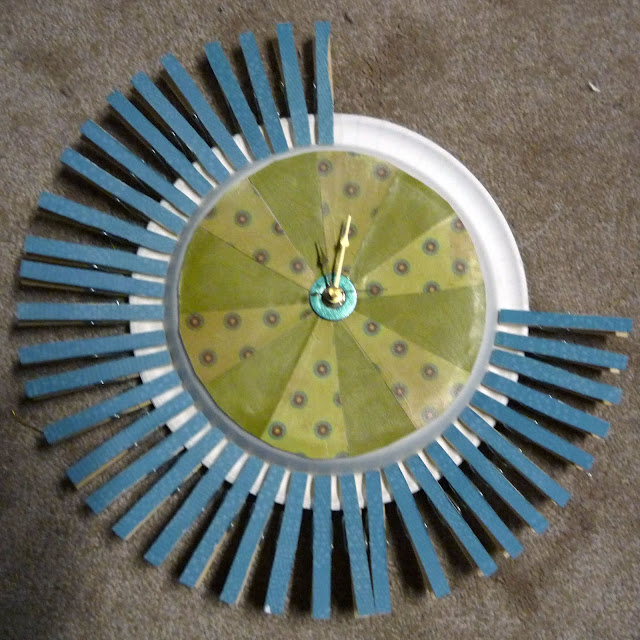
Clothespin Clock {Tutorial}


It's very easy to let time run away from you while working on a craft project. I can't tell you how many times Dad has walked into the backroom and told me it's already an hour past my bedtime.

The solution? A cute, unique, and functional wall clock. It's the perfect bold embellishment in any room, and the bright funkyness is exactly what the drab concrete walls in our craft room needed!

You will need:
  • sturdy paper plates
  • scrapbook paper
  • scissors
  • Mod Podge (or other decoupage glue)
  • a bag of clothespins
  • clock parts (buy a "kit" from a craft store, or gut an old clock)
  • (optional) a washer and fingernail polish
  • something to hang the clock from
  • (optional) ribbon


Gather your materials. 
Note: you will need almost an entire bag of clothespins. I already had one hanging around the back room, because I use them all the time for crafts. (That is part of the reason why I love this clock so much-- I can still use the clothespins, but they are now very cute and are never lost in the bottom of a box!)


 Glue the paper plates together. I used four, so that the clock would be very strong and sturdy.

Cut 2 colors of scrapbook paper into circles the size of the bottom of the paper plate.


Cut the circles into 12 sections. Arrange them so that the colors alternate.

These will mark the hours (although you could use number stickers or other odds and ends to mark the hours-- the possibilities are endless! Buttons,  pom-poms, legos...)

Decopauge this paper onto the paper plate.


Next, decopauge the scrapbook paper onto the clothespins. I found it was easiest to coat the paper with Mod Podge, lay the clothespins ontop, let dry, and then cut them out. Once they are all cut out, apply a top coat of Mod Podge to each individual clothespin.


Next, use a nail or other sharp object to poke a hole through the center of the paper plates. Insert the clock parts and screw them all together.

Arrange the clothespins around the paper plate. My plates had little ridges every few centimeters, and that provided the perfect guide for spacing the clothespins.


Here, you can see that I took a washer, painted it with fingernail polish, and used it between the paper plate and the clock hands. I did this because the plates were not thick enough and the clock movement was moving around.

I also put some red fingernail polish on the clock hands, to make them stand out more.


The next step is to hang the clock. I attached some ribbon to the back of the paper plates using duct tape.

You could then simply hang the clock on a nail. I, however, had to deal with a very not-nail-able concrete wall... so I just used an extra-strong 3M wall hanger. Worked like a charm.

I also added some extra ribbons at the top, for decoration.


Works like a charm! Now I have a bright, bold clock... and a bunch of totally usable, cute clothespins... right where they will never get lost.


-----
Did YOU make something using or inspired by this tutorial? Please share in the comments!

18 July 2011

G.K. Chesterton t-shirt

Please excuse the blech photo of me-- I had just gotten inside after unicycling!
It's not secret that I love G.K. Chesterton. He's one of the most spectacular authors ever; he is one of the few authors whose books are covered with highlighter. (Find out more about Chesterton over at the American Chesterton Society).

I wanted a GKC t-shirt, but most of those out there either have really boring graphics, or did not include my favorite quotes. So, I made my own!


Didn't it turn out awesome? It cost around $25-- I chose the American Apparel fabric, which was more expensive than others. It is incredibly comfy and very breathable. And it's not see-through! I always hate that about most white t-shirts. I've had the shirt for a couple of months now, and it has not faded or shrunk at all.

Click to enlarge and see all the amazing GKC quotes!

This t-shirt is for sale on Zazzle!!!
You can purchase it HERE.


I'm still new to the whole Zazzle thing-- but I'm fairly certain that you can get my GKC design on all types of t-shirts. The cheapest seems to be $19, although Zazzle often runs sales.

I'm keeping the price as low as I can. Zazzle has a base price per t-shirt, and I chose to get only a small royalty from each sale. That way the price is reasonable, and more peeps can share their love of Chesterton!


I look forward to exploring Zazzle more! I'd love to make all sorts of graphics..... you can design everything from t-shirts to coffee mugs to bumper stickers. It's free to list (the first $25 made goes to Zazzle, after that, you get royalties from all sales).

Please bookmark ShealynnsFaerie on Zazzle! If some people buy my bright and colorful Chesterton shirt, I'll make more graphics and list more items! I'm thinking fairytales... artwork... quotes...

I'm going to wear this to the American Chesterton Conference. :)

By the way, someone at the StL airport likes GK Chesterton! Actually, he kind of scared me at first... Mom and I were walking down the terminal on our way back from ReginaCon2011, when one of our fellow passengers (a very tall guy) said, "Your shirt is awesome, I love it," before walking away. Now I wonder who the random Chesterton fan was. :)

16 July 2011

Royal Circlets


I recently bought some more wire, and experimented with a new technique for making circlets.

This circlet, made from silver-plate and rose-gold plated copper, shows off my improved wire-braiding skills.


You can see that I have the new addition of ribbons on the back of the circlet, so that it is adjustable to fit any head snugly.


It was made as one of the door prizes at ReginaCon2011.


For the circlet, I ran out of wire and did not have enough to make a full-size circlet with the dip in front. Instead, I turned it into a headband. It can also be worn as a "flat" circlet with a piece of ribbon tied to the back.


Isn't the sparkle spectacular? The silver wire costs more, but it makes the circlets so much more handsome. I think I will start to make all future circlets in enameled and plated copper, rather than aluminum (unless the cheaper metal is specifically requested as a custom order).


Here you can see the new and improved edges of the circlet. No more tangles or scratches, and you can easily string ribbon through!

This blue circlet/headband is available for sale at my Shoppe { HERE }

I recently received some copper wire from A Beaded Affair, and this was my first project with it. It was also a door prize for the ReginaCon.

  • bgbgb