Showing posts with label craft room. Show all posts

02 September 2011

DIY Book Page Necklace Display

Royal Filigree necklace. Find it {here}.

   Once upon a time, in a land quite near you, there was a sixteen year old who made jewelry. She sold the jewelry to make money for art supplies and saving for the big, scary future. She took pictures of the jewelry to put online. She even did a craft fair or two.

     One day, while in the land of A Great Many Supplies, the girl saw a giant tower of shelves-- and upon them were items that she needed: jewelry displays.

     Happily she danced over to the aisle, but her heart fell when she saw the paper tucked inside of the display. Two numbers were writte on it. 2-0.

     For a little cardboard thing.

     Now, that wouldn't do. $20 is a lot. Even with the magic slip of paper that lessened the price... it was too much. So the girl, being learned in the ways of the DIY (do-it-yourself), decided to make it.


Necklace Display Tutorial
You will need:
Cardboard (I used a cereal box)
Scissors
Paper (I used book pages)
Glue (I used Mod Podge)
Tape
Knitting needle or other hard, pointy object
Sewing pin


This project is part of my Creative/Destroyable Books series. See other book crafts {here}.

Trace the shape of the necklace display onto the cardboard.
The front of the cereal box will be the front of the display. Line up your drawing so that the folds of the cereal box align with the folds of the finished display.
Click the image to enlarge it. Hopefully that will help you see the placement and shape of the template. You just have to wing it. Remember, it's just a cereal box and it costs nada, so don't be afraid to mess up.
(After I finished this project, I saw a similar type of DIY display that has a printable template for making the flat shape. Check it out here.)


Cut out the shape that you drew.
Note that my drawing included curvy lines-- don't cut those out, leave those marking for later.
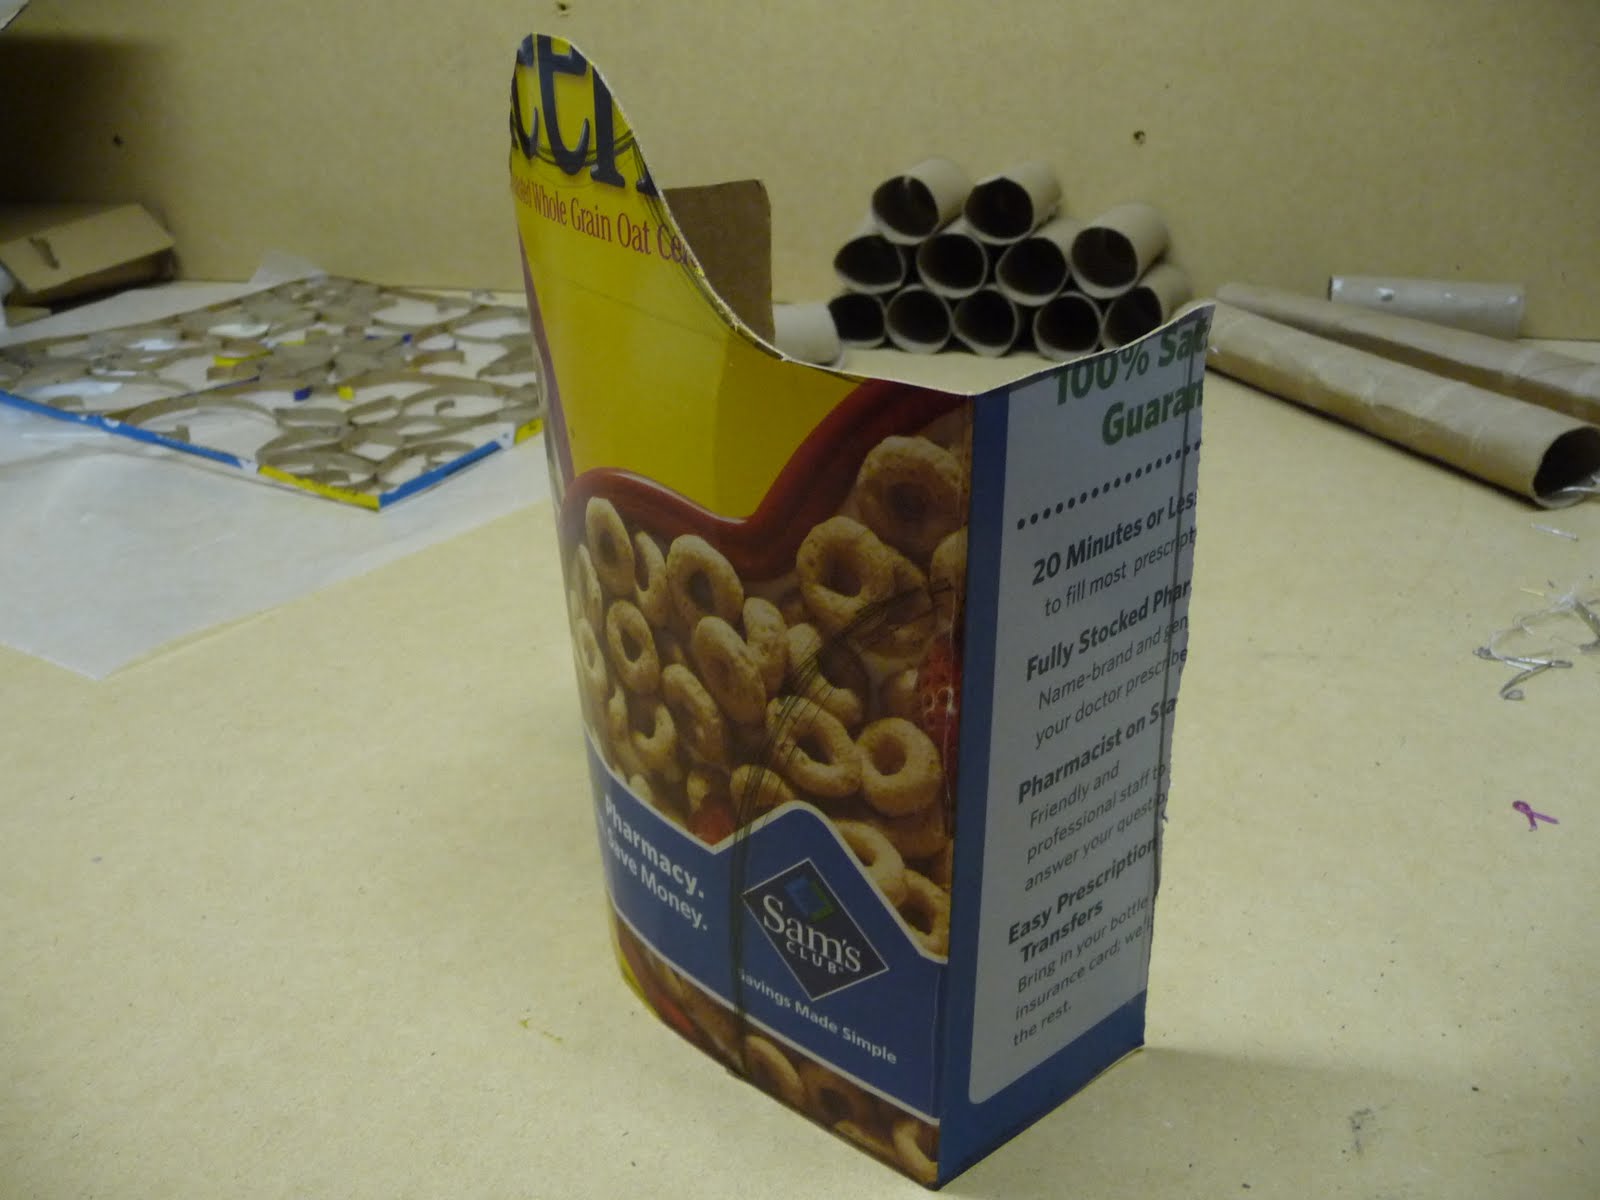
Roll it into a somewhat round shape so that it stands on its own.
(Sidenote: see those toliet paper rolls? I made some pretty cool wall art with them. Check it out here!)


Remember those curvy lines I told you not to cut out? Trace over them with a knitting needle. I found that I had to trace them over on the front and then again on the back.

The knitting needle dented the cardboard so that it is easy to fold the curvy lines back. This makes the display more stable and pretty.

Secure the back with tape.
The Cheerios box isn't exactly pretty, now is it? Let's resolve that.
Grab a Destroyable Book and tear out some pages.
Then tear up the pages.:)
Decopauge the paper bits onto the Cheerios box necklace display.
(Put on a layer of glue, set down a piece of paper, put more glue over that, overlap another piece of paper, etc, etc.)

I thought that the book pages stood out too much, so once the glue had dried, I painted on a light layer of white gesso (acrylic paints works too).
Chainmaille cross necklace. . Email me if you want to know why. 
Ta-da! A beautiful, DIY necklace display.
(And in my opinion, book pages are waaaaaay cooler than the boring black velvet and stark white plastic that I saw in the Land of a Great Many Supplies).
Rivendell Twilight necklace. For sale {here}.
.

P.S. Sorry this is a day late. As I mentioned in my last post, I am being haunted by the evil Blue Screen of Death and the computer is being pickley. :)
By the way, a question for you dear blog readers: should I keep doing Sketchbook Tours? I have several more videos made, but my four most recent sketchbooks haven't been filmed yet.

19 July 2011

Clothespin Clock {Tutorial}


It's very easy to let time run away from you while working on a craft project. I can't tell you how many times Dad has walked into the backroom and told me it's already an hour past my bedtime.

The solution? A cute, unique, and functional wall clock. It's the perfect bold embellishment in any room, and the bright funkyness is exactly what the drab concrete walls in our craft room needed!

You will need:
  • sturdy paper plates
  • scrapbook paper
  • scissors
  • Mod Podge (or other decoupage glue)
  • a bag of clothespins
  • clock parts (buy a "kit" from a craft store, or gut an old clock)
  • (optional) a washer and fingernail polish
  • something to hang the clock from
  • (optional) ribbon


Gather your materials. 
Note: you will need almost an entire bag of clothespins. I already had one hanging around the back room, because I use them all the time for crafts. (That is part of the reason why I love this clock so much-- I can still use the clothespins, but they are now very cute and are never lost in the bottom of a box!)


 Glue the paper plates together. I used four, so that the clock would be very strong and sturdy.

Cut 2 colors of scrapbook paper into circles the size of the bottom of the paper plate.


Cut the circles into 12 sections. Arrange them so that the colors alternate.

These will mark the hours (although you could use number stickers or other odds and ends to mark the hours-- the possibilities are endless! Buttons,  pom-poms, legos...)

Decopauge this paper onto the paper plate.


Next, decopauge the scrapbook paper onto the clothespins. I found it was easiest to coat the paper with Mod Podge, lay the clothespins ontop, let dry, and then cut them out. Once they are all cut out, apply a top coat of Mod Podge to each individual clothespin.


Next, use a nail or other sharp object to poke a hole through the center of the paper plates. Insert the clock parts and screw them all together.

Arrange the clothespins around the paper plate. My plates had little ridges every few centimeters, and that provided the perfect guide for spacing the clothespins.


Here, you can see that I took a washer, painted it with fingernail polish, and used it between the paper plate and the clock hands. I did this because the plates were not thick enough and the clock movement was moving around.

I also put some red fingernail polish on the clock hands, to make them stand out more.


The next step is to hang the clock. I attached some ribbon to the back of the paper plates using duct tape.

You could then simply hang the clock on a nail. I, however, had to deal with a very not-nail-able concrete wall... so I just used an extra-strong 3M wall hanger. Worked like a charm.

I also added some extra ribbons at the top, for decoration.


Works like a charm! Now I have a bright, bold clock... and a bunch of totally usable, cute clothespins... right where they will never get lost.


-----
Did YOU make something using or inspired by this tutorial? Please share in the comments!

08 July 2011

Storage Tip-- Tackle Boxes

Until the computer (and my files) are working, I'm going to share some shorter posts (with unedited pictures and everything). No tutorials or good photography yet... just some of my most recent tips, tricks, and little projects!

 
Beads.

 
They are so hard to store! The little things never want to be sorted or organized (or even get found when dropped on the floor). I buy beads in small amounts, and it is difficult to find containers to keep these little beads marching in order.

 
Craft stores have plastic containers with dividers, which are great for organizing beads and other little odds and ends. But $10+ for a plastic box? I don't think so.

 
My mom used to do some cross stitching, and she had two old plastic boxes that she kept embroidery thread in. I put the thread into a Ziplock baggie and put those boxes to good work. However, the "cubbies" were deep enough and the dividers far enough apart that the box was only good for the beads and jewelry findings that I had alot of. Sets of 100 little beads still had no storage, and there were no options for other sizes or types. Even so... I filled up the two boxes and needed more.

 
But I was not spending $20 on a little plastic thing.


Later that week, Dad stopped by the fishing aisle during a Walmart shopping trip.  That is when I saw them.

 
Tackle boxes.

 
Glorious little boxes, of all sizes. Big cubbies, little cubbies, super tiny tiny deviders. Huge boxes, miniscule boxes... Wonderfully sturdy plastic boxes. And all were HALF the price of the containers in the craft stores. (Half price, or sometimes even less).

These tackle boxes are great for many other things, too! Here's some ideas:
  • tackle (obviously)
  • sewing notions
  • random craft knicknacks (come on, we all have a bunch!)
  • jewelry (one of my friends uses these to organize her rather extensive collection of jewelry)
  • small office supplies (think cap erasers, pencil lead, paper clips...)
  • ...and basically any collection of small items!
 
The picture above shows one of the re-purposed embroidery thread boxes (bottom), and a tackle box (on top).

 
I love the little tackle box. It opens on both top and bottom (double sided) and has small, shallow (and adjustable) cubbies-- perfect for organizing my ever-growing collection of small sets of Czech glass beads. It is much, much sturdier than the "craft organizing box"-- and it was THREE BUCKS. Three bucks!

 
I also saw this:

 
$35 for a big giant tackle box, that includes about 8 little plastic cubby-boxes and even more compartments throughout it. If only I could justify spending $35! It really was very tempting, but I have a craft room with plenty of space to store supplies. This box would be perfect for someone who needs to maximize space.

 
So maybe when I go off to college...?

23 February 2011

{Tutorial} Orange Crate Ribbon Holder


I've several spools of ribbon, wire, and tape that have been floating around the craft room and making mess!

So I turned an orange crate into a handy little holder!


You will need:
  • a wooden crate (I used a 5lb clementine crate)
  • wooden dowels or unused knitting needles
  • a nail, Xacto knife, screwdriver, or other sharp object
  • paper
  • Modge Podge
  • paintbrush
  • your collection of ribbons, wires, tapes, or anything else on spools


Step One: Eat the clementines. (This is the yummiest part).


Step Two: Poke some holes in the crate.
This is the most difficult part. I used an Xacto knife and an old nail. Smarter people can use a screwdriver.
Make sure that the holes line up and that your dowel/knitting needle can fit through it.


Step The Third: Prepare your paper...
 We have many pretty papers but I was in love with the Asian designs on some of my fabric. So I photocopied the fabric. 'Cause it works. Just let the ink dry completely.

The Fourth Step: Mod Podge the paper on.
Paint a layer of glue on the crate. Press the paper on and get rid of bubbles. Let it dry for 2 minutes and then paint on a top coat of glue.
You could use a different glue but Mod Podge would work the best.


Step Five: Slide the ribbon on!

Here you can see that I used a knitting needle in the middle. This works wonderfully if you don't have wooden dowels on hand. 


Enjoy your ribbon holder!

I use mine for more than just ribbon-- tape, wire, and even a bobbin are all on there. Just wait until we unpack that other box of craft supplies. Mom has many spools of ribbon!


Tip: A small bit of Scotch tape or a sewing pin go a long way. Use it to keep your ribbon attached to the spool. (Unless you are itching for a mess to clean up, that is!)
Let me know if you try this tutorial! Leave a link in the combox (comments box) with a link to your own blog post or to a picture! 

Linky, linky, linky! I'm linking up at these parties.

11 February 2011

The Befores

You're going to be seeing much non-jewelry random-craftiness around here.

Do you know why?

Because, dear Fairy People, you expressed interest in how I'm decorating!


I'll introduce you to my bedroom first. Then comes the craft room. :)


Now, I was very excited about moving to our new house. My bedroom, which I share with my 7 year old sister, is very big. I wanted to decorate our room just like Arwen's from Lord of the Rings.

(pics here and here)
(More inspiration HERE, elf room in Rivendell.)
Very Art Noveau.


Then came some hitches in my "plan." I realized how much it would cost (waaaay too much). My sister didn't like the idea too much. And my parent's weren't big on me going decorating-overboard when I will be moving out for college in a couple years.


So... new plan! Our bedroom has become the furniture cast-off room. Anything old or unwanted or scratched gets to come in here.


Top: First couple of weeks at the new house. We were orginally going to keep it like this and jigsaw some headboards for the beds.

Below: In the process of moving furniture around


I get to do whatever I want to the room! 

In the spring Dad will help me paint the furniture (not the walls, though, but I do have a mural planned).

Addie and I have a color scheme. Thankfully we both love blue, she can stand green, I can stand purple, and cream is pretty basic and girly.


Other than that, our room will be a true mash-up. I want Elvish, she wants Princess. I also like your typical bright, bold, teen designs, while she favors the pastel little girl look.

We also have some Chinese decorations that Dad brought back from a business trip, so we've got an Asian look going. Plus some shabby chic and "wrought iron."


We're going to have it all!

Hopefully the color scheme will hold it together, but you know what? That's not the goal. We just want a fun and beautiful room to enjoy! Who cares if it is eclectic? (Haha, I mistyed that as "electric.")


People are always telling me that they don't know where I get my talent. No one else in my family is particularly good at arts and crafts. (Aside from my grandma, who only did a little bit.)

Well, I know where I get it! (At least the creativity part). DAD. He's an engineer with the biggest imagination in town.

Adelynn's "Princess Tower Bed" with a "dungeon" underneath is made from an old bunk bed. Dad had built it for my brothers years ago but it was in bad shape.

So he turned it into a loft bed and perched it (screwed it) on top of a dresser we got from the old Newman Center when they were demolishing it.

Yes, that furniture need PAINTED. I do not want dark green. :D

I've still got my pastel fairy quilt. :) Dooooon't like pastels but it's still pretty. Adelynn's just-begun dollhouse is on her desk.


Here is my school desk and bookshelf. I homeschool and do all of my work in my bedroom.

Funny story-- the bottom two shelves of that dresser are full of doll clothes and accesories. My grandma likes to sew doll clothes... alot. :D

And the side is entirely covered with stickers (Addieeeeeee!) which I can't seem to get off.

And the window shades are both broken, but maybe fixable.

And the bullein board squares? A $5 find at Staples, because it was a bit beat up.


Now, as far as decorating our bedroom goes, it's going to be DIY. I'm just a teenager with no job aside from my jewelry Shoppe (and I probably won't have a job for a long time; Dad prefers the idea of summer college classes over a boring summer job that doesn't pay all that much, and I actually agree).

I don't like to bug my parents to buy every neat thing I see (um, rephrase that, I'm not allowed to pester and I know better than to eye the expensive stuff).

So I am going to decorate with CRAFTS! And ART! And.... it's just HAPPINESS!

There aren't going to be any "after" pictures. It's an ongoing process and I'm going to keep making stuff for forever, I'll never be "done." Not knowing me!

You will be seeing all these crafts all over my blog soon. :) 


The Craft Room/ Art Studio

 Yes, I tend to make a mess.

(So, remember how I made a v-log a couple of months ago? I was going to show you the craft room but decided the video was too long. So now you get to see that footage. Excuse the UMMMMM at the end.)


(If you can't see the video-- for some strange reason, it's not embedding the right way-- you can see it HERE.)


Here you can see part of the basement. We've built a double-sided "wall" of bookshelves in the middle of the basement, and you can see part of it here. You can also see how we dry out our snowclothes. :)

...and... that desk and all the mess is my "studio!"

 I cleaned up a bit:


OK, so the craft room is not mine. I'm the only one who uses it, though. :)

Would you believe that we got the nice, big Jeep desk for free? The people who owned the house before us no longer wanted it.

This is where I do all jewelry, crafts, and art.

I'm going to be sharing cheap, easy, and (hopefully) creative organization tips on the blog!

My first tip-- to stick the lightbox ontop of the bookshelves. It frees up lots of space on the desk.

Also, don't leave cardboard boxes on the floor. Because then the basement might flood when the well goes crazy and then you'll have a mess to clean up and it will smell like mold.


Please CLICK HERE if you would like to see the posts about my bedroom and the craft room! (The link will automatically update with any new posts).

  • bgbgb