27 August 2012

Crayon Batik {Tutorial}

Originally published at Confessions of a Seamstress as a guest post.

Today I'm going to teach you how to dye fabric using crayons! You can make something like this:


It all began with Ukrainian eggs! A couple of months ago, I was excitedly talking to my art teacher about pysanky, in which eggshells are decorated with bright dyes using a wax-resist technique. This made her remember a project that she did in art school: batik.

Those of you who frequent fabric stores might recognize that word. The really pretty, brilliantly colored fabrics with intricate designs at around $15 a yard? Yup. Those are imitation batik fabrics. Traditional batik is even more expensive because of the ardourous handmade process. A swath of fabric is dyed in a light color, and then beeswax designs are drawn onto the fabric by hand to "lock in" the light color. The fabric is then dipped in a darker color and waxed again, and the process is repeated many times before the dye is allowed to set and the beeswax is removed.

Just as I made Sharpie Easter eggs because I didn't have the tools for pysanky, we figured out how to "cheat" at batik using crayons! (It's not an original idea-- I had seen it done once before on a blog called Suzy's Artsy-Craftsy Sitcom).

This is definitely a do-and-learn project. If you attempt it and have any tips for me, please share!

DIY Crayon Batik
Supplies
Crayons (the perfect way to use up that old box of broken crayons-- my family had two shoeboxes full, but we only used half a box in art class, shared between six or seven batik projects)
Muffin pan (mini muffin pan recommended for lots of colors/mixing)
Heating tray or oven
White cotton fabric
Cold water dye (hot water will melt the wax) and gloves
Cheapie paintbrushes
Iron
Newspaper

Now, the whole idea is that you paint the crayon wax onto the material, crumple it, spray the black dye into the cracks in the wax, and iron the wax off the material. The dye from the crayon will remain, all pretty and bespeckled with the black dye.

And as a bonus, you get these weird flat crayon discs.

I've all sorts of pictures to help you along. :)

Start by peeling the crayons and putting them in a muffin pan. Melt them on a heating tray (or in the oven-- beware that they will cool quickly in that case). Then prepare your design on the cotton with a pencil.


(At this point I'm going to point out that my Celtic knot is not a real knot because I made several mistakes in the over-under pattern!)

front
back
Use cheap paintbrushes to paint the melted crayon onto the cotton (the paintbrushes will be ruined). Once the wax is on, there is no getting it off-- so be careful! Start with the main design first.


Make sure that the crayon has completely permeated the material. I set the cotton on the heating tray between each color to make sure that the dyes really "set."

This is important! We ruined our first attempts because crayon cools quickly and cool wax just sits on top of the fabric. The color didn't set.

(Melt the most important colors first so they don't bleed together badly).

Front
Back-- notice how very little of the yellow actually permeated the material?
Continue this process until the entire piece is covered with crayon.

This was my first project, a pseudo "Dan-Cheong" based off a Korean style of architectural painting.
 I did not heat the material between colors. Instead, I melted everything all at once and made the colors run together.
Be sure to melt the wax between each color and pay attention because you don't want the colors to run together.


Both of these pictures show crayon batiks by the younger kids. You can see a few of them whose colors ran together. As always, click to enlarge.

Then wrinkle it up!

Every time you wrinkle the fabric, it creates cracks for the black dye to seep into. Don't wrinkle too much or else your final piece will be almost completely black. (Yes, another thing learned the hard way.)

This is my teacher's first project; she crinkled the fabric too much and dipped the material in the dye, rather than spraying the dye. You can barely see the hot air balloons.

Spray the dye onto the material and let it set as per label instructions.

We based this project off of Suzy's and took her advice about cold water dye. You certainly do not want hot water melting your crayon artwork into a big blob!


Next, place the material between layers of newspaper and heat the iron to the highest setting.

Iron the wax out of the cotton.

This is a tedious process. DON'T keep ironing after the wax is showing through the newspaper or you will do what I did and re-melt the wax back into the material, creating a big mess and making colors run. Change the newspaper several times a minute.

Yes, you'll go through a lot of newspaper.

Iron until the fabric loses its stiffness. Rub the material with a paper towel. If no color rubs off, you are good to go.


I haven't tried putting this through the wash. I figure that as long as no color rubs off, it isn't going to stain anything!


Do whatever you want with your handmade art fabric! I turned mine into a decorative pillow, proving that I cannot sew a straight line (it's horribly loppy!). Now my Celtic-knot obsession gets to live on my bed! It even matches my curtains. :)


Enjoy!

24 August 2012

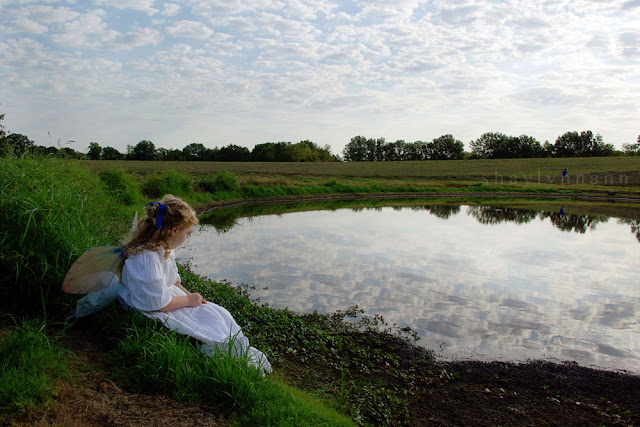
The Water Fairy

click to enlarge
I have a really wonderful sister.

A couple of days ago, I realized that I needed a few photos of a water fairy for the magazine. A fairy with wavy blonde hair, a white dress, and blue wings...

I've made my little sister dress up in all sorts of costumes and pause in the middle of many games in order to experiment with my camera. Most young girls would be completely tired of this-- but not 'Rosie.' She is a tireless, cute model and loves seeing where pictures of her wind up-- be it on my facebook page or at the library (the photo of her in a book page skirt won a contest there).

When I told her that I needed her to dress up as a fairy and wake up early some morning so that I could photograph her in the sunrise, she squealed and hugged me and called me the best sister ever.

Really, what do I do to deserve that?


While I was at a four-hour long chemistry lecture two days ago, she apparently asked Mom and Dad to put her hair in curlers. She woke up yesterday morning bright, chipper, and excited to see her hair curly. 

I wasn't so bright and chipper; I'm not a morning person and I certaintly wasn't prepared to get a photoshoot started a six in the morning. But I rushed around the house, forming two coat hangers, a pantyhose with runs in it, and some glittery paint into a pair of makeshift fairy wings. After a few minutes in the garage (and after making a messy pile of boxes) I found my old petticoat dress. Next came the rush to find some small water shoes. 

Rosie wasn't dressed until the sun had already risen, but the sky was adorned with brilliant clouds and the lighting wasn't stark and overwhelming. So we waltzed outside...


We have a beautiful little pond in our backyard, and thanks to the drought it is only a couple of feet deep. I wanted Rosie to wade into it and let me photograph her standing in it.

What I didn't know?

She's afraid of the touching the pond water. One of our brothers had told her that venomous snakes live there (we've never seen a snake!), and the single splash of one frog jumping into the water was enough to make her squeal. I thought she was just being silly, and said as much (what a mean sister I am!). She put on her brave face and took a few small steps towards the water...


Squish, squash, bluuuuuuurp. The ground was very, very muddy. She sunk a good three inches into the mud and made a strange gurgling sounds in the back of her throat. I could tell that she was thinking of those stories about people sinking in quicksand.


That wouldn't do; Rosie would not succumb to quicksand and become a snake's breakfast. She skadoodled back onto solid ground.

"I'm so sorry, Shaylynn! I just... ick... I was sinking!"

I suggested we go inside, but she felt bad that I didn't have the photos I needed and gave it another shot-- this time walking towards the water from her favorite fishing spot.


That didn't work out, either.

Rosie's nose and ears turned bright pink. She was almost in tears.

I asked her if the mud was too icky. She nodded, then shrugged sadly, and said, "But you're not going to get the pictures you need!"

It just about melted my heart.

Forget about all the times I complain about her annoying way of interrupting me or pestering me to do things or never ever cleaning her part of the room. She really is the sweetest little girl, ever.

I tried to convince her that it was okay. I shouldn't have expected her to walk in the mud-- even I wouldn't want to do that, after seeing how gooey it was! But it was to no avail.

We found some nice solid ground and took some more fairy pictures.


I didn't have the heart to tell her that these won't work for the magazine's short story. (Who knows? Maybe I can manage some fancy Photoshop and make it work?). She was just so worried about me!


She looked like a little angel!


Rosie still kept saying "sorry" between every couple of sentences and it took a fair amount of time to convince her that no, I did not need her to try walking in the scary water again.


My brave lil' sis!


When I opened up the pictures I was excited to see that they turned out quite well! They may not work for the short story, but they are pretty in an of themselves. Well, and because of Rosie, of course!

She was swordfighting and wrestling my brothers with her super-curly hair and brand-new fairy wings earlier, so I think it's all OK now. (Wish I had a picture of that!)

And this, my friends, is why you should always exclaim AWWWWWW anytime I post a picture with my little sister in it. She isn't just cute. She's super sweet.

21 August 2012

Writer's Guild Featured!


The St. Louis Catholic Writer's Guild was featured in the St. Louis Review, a publication of the Archdiocese of St. Louis!


Yes, I know, you're wondering what I'm doing at a Writer's Guild. I'm an artist, right? Well, writing is still one of my passions (I wrote a novel when I was 13! It's absolutely horrible!). I do a lot of writing, although I rarely post it online-- multiple essays and articles each week, along with fiction stories written with friends-- and I would do much more if I didn't set artwork as a higher priority during my free time! However, the Guild is not just for writers. We've had wonderful discussions on the role of faith in any creative outlet and since I'm wanting to study graphic design in college, I enjoy listening to them talk about the publishing process.

So, once every two months I drag two of my friends down to this cute coffee shop for the Writer's Guild meetings! We're the youngest, but that just means that we get to learn from everyone else's experiences! Unfortunately I haven't been able to attend as often as I would like (things like SAT exams and visits with my cousins always seem to happen on the same day as the meetings). The reporter attended the July meeting and spoke with everyone in attendance.

She then called me for an interview since there was not a lot of time at the actual meeting, and she was so sweet that my nerves calmed down pretty quickly.

 (I have a very hard time understanding people when I can't read their lips and body movements, or at least know what color their shirt is-- yes, that's a little weird, but... yeah. When my cell rang with an unknown number and I realized it was her, my heart starting doing a little giddy dance. I just knew that I would flounder and ask her to repeat herself a million and one times. However, she was really easy to talk to!)

I was worried that I'd sound strange in the article; after all, talking to someone on the phone doesn't give you a ton of time to plan out what you're going to say! But it's a neat piece and I am so honored and humbled to be a part of the Writer's Guild and that we were featured in this newspaper!

They asked me to bring some artwork to the meeting, and the photographer snapped several pictures. Then, they went and printed my Phoenix painting full-page! I'm honored, humbled, and a little overwhelmed about that!

The only thing is that there were only three of us who were really featured; there are several more people in the guild and they are all really nice and great writers.

I just wanted to say thanks to Ms. Brinker for writing the wonderful article (which you can read online right here), and I hope that more people will find out about the Guild and join in the fun!

There are a few shout-outs in the article, so here are the links: A Plan for Joy in the Home by Laura Dominick, Regina Doman's awesome fairytale-retold YA novels, Mater et Magistra magazine, Gilbert Magazine, and Ink and Fairydust. And, of course, the St. Louis Catholic Writer's Guild and the St. Louis Review newspaper.

-----

Speaking of Gilbert (which is an awesome magazine, by the way), I don't think I ever shared the second Chesterton doodle that I drew at the Chesterton Conference and which they published! G.K. just looks like the perfect kind of guy to be riding a unicycle, doesn't he?


(The first doodle is here)

17 August 2012

Ear Cuffs: The Bow Tie Technique


Bow ties are cool.

(I'm not going to stop quoting the Doctor until things stop reminding me of the Doctor. I should have made this cuff out of blue wire, then I could have called it the TARDIS Ear Cuff!)

In case you haven't heard of ear cuffs before, they are basically jewelry for your ears that don't require piercings! They are comfier than clip-on or screw-back earrings, and they can range from elegant to funky. You can see a few here on my Shoppe.

Whenever I have a smidge of free time, I'll head to the craft room to tinker. I've been experimenting with different kinds of ear cuffs, and thought I'd share some behind-the-scenes photos! I've got three new techniques and variations figured out already. These posts aren't going to be full tutorials, but hopefully they will inspire you to do some creative tinkering of your own!

Before you go any farther, you'll need to check out the basic ear cuff tutorial and the swirly ear cuff tutorial. You need to be able to make both of those designs with a decent amount of ease before you tackle this not-TARDIS ear cuff.

You'll need:
- 6 inches of 18 ga wire
- needle-nose pliers
-flat-nose pliers
- (optional) 24 ga wire and beads

Cut 6 inches of wire


And create a double-loop bow-tie with your pliers. Use the bottom of your pliers, the widest part, to create the loops. The overlap from both ends should be on the same side.

Experiment with the placement of the bow-tie. The ear cuff will look really different depending on how long those ends of the wire are.

 (I did mention that this is not a full tutorial, right? You're on your own to figure out how to make the loops. It should take less than 5 minutes of playing with the wire to get the hang of it, though, it's really easy).


Take the loose end of the wire on the top of the ear cuff and fold it over along the backside of the bow tie.


Fold the other loose end of the wire (in this case, the 'other loose end' is very clear because it's longer) up along the backside of the bow tie.


(Optional) Fold that same end (in this case, the long length of wire) back down across the front of the bow tie.

If you leave the end of the wire sticking up, the ear cuff will climb up and down the length of your ear. The ear cuff I'm making in this semi-tutorial is only going to climb down the ear.


Now you've made the knot to tie the bow tie up nice and snug; just use some flat-nose pliers to flatten that knot so it's more comfortable.


Ta-da!

Next, wrap the bow-tie around a marker and tweak it with pliers to make the bow-tie grip your ear comfortably. (The how-to for this step is found in the basic ear cuff tutorial.)


 Next, use needle-nose pliers to swirl the ends of the wire however you would like! (a la the instructions I gave in the swirly ear cuff tutorial).

Note that the knot sits on the outside of your ear. The swirls are the only thing that determine which ear the ear cuff belongs on-- unlike the swirly ear cuff, which has to be designed from the start with either the left or the right ear in mind.


Here's a nearly identical one on my ear; you can see that I added a small brown bead to the top swirl and I made the bottom swirl pointier.


You can also take thin 24 ga wire and use that to wrap coils, loops, and beads onto the ear cuff. In this photo, I let the ear cuff 'climb' both up and down my ear.

Voila! Hip hip hooray and happy day! You have a bow tie ear cuff, and bow ties are cool!

(As always, please be sure to reference me if you use this technique in making your own ear cuffs. Thanks!)

12 August 2012

Why Unicycling Should Be An Olympic Sport

photo illustration by yours truly

Today I interrupt your ordinary arts-and-crafts posts to say, "UNICYCLING SHOULD TOTALLY BE AN OLYMPIC SPORT! While I love the fact that unicycling is very unique I certainly wouldn't mind it becoming popular and having talented athletes explore the depths of what can be done on one wheel.

I've been bit by the Olympic spirit, having watched every gymnastics event with my little gymnast sister. So of course I was thinking about it yesterday while riding on a hiking trail. I can barely ride my unicycle backwards, but recently I've been looking at videos of some impressive athletes who do spectacular things on one wheel. Unicycling could totally be an Olympic sport, and this is why...

Reason 1) Unicycles are awesome.

Reason 2) Unicycling is challenging, rewarding, and a very diverse sport. It's still a young sport-- it wasn't taken seriously by athletes outside of circuses until recently-- but already there are unicycling events that mimic (and often 'branch out' to the point where they only borrow a few concepts of) a wide variety of events such as trials biking, mountain biking, freestyle skateboarding, dancing, ice skating, hockey, racing, and slacklining. Plus, you have the typical unicycle tricks that people think of, like juggling while riding a giraffe uni.

Reason 3) THIS:

(extreme off road riding)


(beautiful dance, like ice skating...)


(street)


(cool show with a violin)


(another dance, and a favorite song)


(WHAT IN THE WORLD AND HOW DOES HE DO THAT?)


(crazy circus tricks)


(Can you tell I'm fond of the dancing? This starts getting totally awesome around halfways through).


That is all.

08 August 2012

French Revolution Gown Photoshoot


One day I was visiting with a long-missed friend, and forty-five minutes before she had to leave we did a photoshoot of her in her gorgeous French Revolution style gown. My papa's loaning me his amazingly awesome SLR camera and this was the first photoshoot I did with it. Here's a sampling of pictures:


Just look at the gorgeous details on this gown! I remember her showing me the fabric rolls before starting the sewing project and sighing a little bit inside when I felt the silkiness of the silk (um, no pun intended?) and the detail of that lace.


We tried out best to avoid the poison oak in the woods. Actually, I'm used to just tramping through the stuff (I've only reacted to poison ivy). Maneuvering through the poison oak and thorn bushes in a big skirt... it's not an easy task!


Everything was so much greener before the drought. :/


These two are some of my favorites, although technically they are not the best. I'm still getting used to SLR cameras and in neither photo was the focus completely on her face! 
She's a very joyful young woman, don't you think? :D


This unedited shot simply had to be shared... I accidentally let go of a branch and it swung into the frame! 


Thank you so much for letting me share a few pictures from your photoshoot, dear friend! 

  • bgbgb