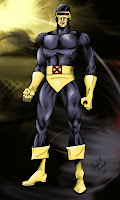
I'm am so excited to introduce Elenatintil! You've probably heard me talk about her before. Although I haven't met her in person (yet), she has been a huge inspiration in my life! She runs the Fairy Tale Forum, edits and produces I&F, directed the Shadow of the Bear-- The Movie, helped get me started on the whole writing-is-actually-really-really-fun, and more.
Elena is a wonderful artist, and I've been amazed by her coloring skills. Today she is sharing a tutorial on digital coloring. You don't have to buy a fancy software-- Elena uses GIMP, which you can download for free here.
_____________________
Elenatintil is a writer, artist, and costumer who regularly blogs on art, film, books and life at www.elenatintil.blogspot.com. She also is an occasionally ambitious filmmaker, whose latest project is a feature length film based on Regina Doman's "The Shadow of the Bear." You can find out more about the film by going to www.theshadowofthebear._____________________
Have you ever wondered how to color a picture on the computer? Believe it or not, digital coloring is fast becoming one of the primary color mediums for artists today. Nearly all comic books are colored digitally, and most fan creations feature the medium as well.
I really enjoy digital coloring. It's a flexible, forgiving medium that can be easily reproduced, shared or tweaked, and you can get started for free. I use the software GIMP (which this tutorial will be using), which is a free online software that functions like a slightly less sophisticated version of Photoshop.
You can also color using a mouse (I actually got started using my laptop touchpad!), but if you really get into it, I highly recommend investing in a digital drawing tablet. Top of the line is a Wacom, of which I have the Wacom Bamboo Pen. At $70 it's a good price-range for a Christmas or birthday gift.
So, lets get started, shall we?
For this picture I will be using an inked sketch of X-Men leader Cyclops. Comic book art these days has gotten so good that it's worth studying for the technique alone. It's also the perfect platform for digital drawing.
#1 – Open your black and white inked drawing into GIMP (or the software of your choice).
#2 – Under the inked layer, add another layer of pure white. Then, set the inked layer to “multiply” (as shown in the photo below). Multiple automatically makes all white pixels transparent, so that any coloring you do underneath the inked layer will show through everything except the black lines.
#3 – Then, between the inked layer and the white bottom layer, insert a transparency layer (as shown below). You will need one transparency layer for every main color involved in your drawing. In this picture, there are four main colors (skin tone, blue, yellow and red), thus I will need four transparencies.
#4 – First off is to lay down flat color. Flat color is a single tone, with no high lights or lowlights. I start with the skin layer, and work my way upwards through the clothing layers – skin, blue, yellow and finally red.
To lay down flat color, I chose a solid brush and color close to the lines, but it's okay if I go a little over – I'll fix it with my eraser later.
#5 – I repeat this step with each layer until I've laid down all the flat color for the entire figure.
#6 – now it is time to add highlights and lowlights! To do this, I start with the top layer. The reds dont' need much, so I'm going to demonstrate with the blue uniform. First off I use my color picker tool (pictured below) to select the blue tone.
#7 – I then open up my color palette (pictured below) and select a shade of blue slightly darker than my flat tone.
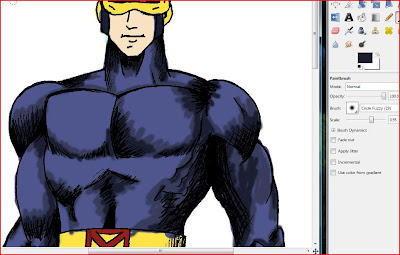
#8 – using a feathered brush (pictured below) I paint in the shadows.
#9 – for added depth, I repeat the last few steps with an even darker shade of blue, coloring a smaller portion of the shadows. This creates dimension.
#10 – time for highlights! Highlights are created the same way as lowlights/shadows, but using progressively lighter shades. Highlights should go on the protrusions that would be well lit, using pure white to create the shinest effects.
#11 – time to polish things up! I take my smudge tool and blend the edges together, creating a smooth, almost painted effect.
#12 – After adding highlights and shadows to all of my layers, I decided that Cyclop's face was too pale for such a man of action. So I opened up my curves graph and adjust the dark and light values.
#13 – this still isn't a rich enough tone, so I head over to my hue/satuation options and up the satuation a bit.
#14 – now it's time to add a background! (I add backgrounds before doing the final erasing because it is easier to see the edges this way.) To create a background, I add another layer below all the transparencies, but just above the bottom white layer. For Cyclop's background, I decide to go with black, and jazz it up with a few brushes in the same colors as his uniform.
#15 – next I go through all the layers (starting with the top) and erase any sloppy edges. I then merge all the layers together and save the image as a new file (so that my layers are still available if I want to make changes later on).
#16 – I'm not entirely happy with the colors yet, so I make a copy of the picture. I then use the colorize function to turn the top layer blue. I lower the opacity of the blue to about 34% so that most of the original color still shows through.
#17 – now the colors are a bit too cool – I want some more warmth. So I repeat this step with red and yellow layers. Now things are looking snazzy...


No comments:
Post a Comment