30 April 2013

My DIY Craft Fair Display


Yesterday I was a vendor at the St. Theodore Tea and Fashion show and I needed a display to put my jewelry in! I spent exactly zero dollars on this, and just used things we had lying around the house! Somehow it still managed to look pretty professional and now I want to do more craft fairs just to use it! (I don't know if I'll be able to this summer, because it's such a time commitment--- we'll see!).

I know that most of you won't have supplies like these on hand, but I always like to see how others come up with solutions for things even when I don't have the supplies on hand. It usually helps me to think outside the box-- something I had to do a lot of for this display. No way was I going to spend $100 or more buying the "real" supplies that "real" artists use at fairs. I can buy beads and wire instead! :) The only item that I personally bought was the white necklace stand, and I got that months ago to use in photoshoots.


As I thought about putting a display together, I kept thinking about height-- no one likes bending over to see things!

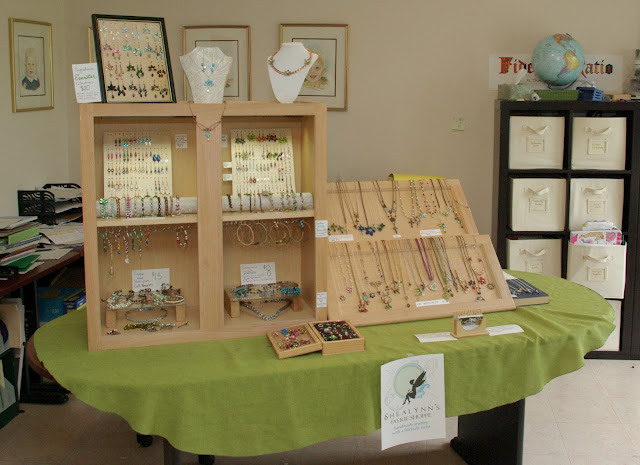
The main part of the display is an unfinished oak kitchen cabinet which my Dad bought for $20 because it was damaged. We haven't given it a proper home yet, so it was out in the garage receiving a coat of cobwebs. It's heavy, but not too heavy to carry by myself.


The earring racks are two pieces of thin wood which I cut into rectangles with the scrollsaw and drilled dozens of holes into. The only downside is that a couple of the earrings get stuck in the holes-- they aren't too hard to get out, but they aren't too easy, either. It does make it easy to transport because none of them fall out on their own!

(By the way, I'm curious to know how other artisans price their jewelry for craft fairs. I rarely have more than one of any item on hand, except the ever-popular Evenstar collection, and it's tedious work to put a price tag by every item. Online, I can set each item to the exact price for my supplies and time. I would up compromising yesterday and averaging out the price of items to the nearest even-dollar increment. This meant that I had $7 and $14 earrings on the same rack, priced at $10. It's not ideal but for a one-day event I didn't know what to do!).


The strip lights are something that Dad had in the garage-- something for his truck, I've no idea what they are exactly but they are battery operated and stuck to the top with double-sided tape!

The bracelets are all resting on an empty roll of wrapping paper which I covered with part of a papery fabric tablecloth-- the same one that I use to wrap orders in when I run out of fabric or organza bags!


I put all the cuffs on the bottom of the display and gave it some height using glass from picture frames and wooden blocks.

I'm pretty proud of the hooks for the guitar string bangles and chainmaille keychains! I made it out of this giant roll of cheap aluminum wire I have on hand.


I was trying not to damage the nice cabinet so I used masking tape-- it was just strong enough but I was afraid it would fall down as people fingered the items! (it didn't!)


We had this wooden box lying around with knickknacks in it. I rolled up some fabric into little rolls and laid them side by side to display my rings properly. The cheaper plain wire rings and guitar string rings got jumbled up on the left because I had too many!


The necklace display is made from the cabinet doors. It wasn't ideal-- I think that necklace displays do a much better job of showing off my full necklaces. If I do any craft fairs in the future I will reserve these door displays for the pendant necklaces only. It works *great* for that!


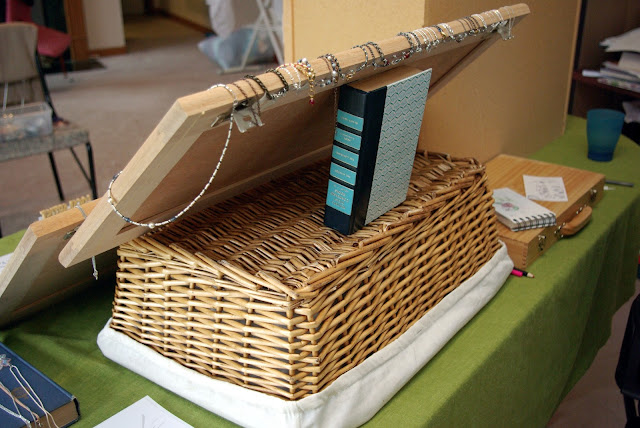
The doors were just propped up on a basket and a book. They also have wire hooks taped to the back.


Lookie! Lookie! More Evenstar colors! It turns out that it's very difficult to find the leaf beads that I use for the Evenstar sets, especially when the website I usually buy from stopped carrying half the colors. Other places have them for crazy expensive prices. Think 50 cents or a dollar a bead. Then I found Brightling Beads and Shipwreck Beads so now I have every color they have in stock. Lots of new Evenstars!

I also will start using silver-plated chain instead of aluminum for the Evenstars. The aluminum I had before was cheap but wasn't up to par.

Anyway, the Evenstar necklaces and Enchanted Forest earrings are on another thin sheet of wood. I drilled holes for the earrings and nailed nails in to hang the pendants up.

The sapphire blue set is on the necklace stand that I made with an old book and a cereal box-- check out the tutorial here.

This is the necklace stand that I bought at Michaels awhile ago, and a folded-over index card (the perfect earring display in a pinch!). 

This necklace very similar to the Eowyn necklace I made a few months ago, only (*cough* if I may say so myself) better made.


It's the first new item that I've had a chance to put up on my Shoppe-- check it out!

Hope you liked this peek at the jewelry display I dreamed up!
27 April 2013

Preparing for a Craft Show

This Sunday I will be selling some of my jewelry at the St. Theodore Tea and Fashion show-- local friends, please come stop by! There will be lots of good food and fun, and it all supports the church's mission trip.

Here's a sneak peek at some of jewelry I've made in the past three weeks.

(These first few pictures are from my Instagram account-- @ShealynnsFaerie. It's a weird story why I have an account when I have to use my mom's phone to do it, but basically one of my youngest brothers signed up without permission and now I have to monitor him. What better excuse to start posting my own over-edited, blurry snapshots?)


These are some brand-new chainmaille bracelets! I've been having fun with my two favorite weaves: the Byzantine (lookie at the blue and green ombre!) and the two-in-two mobius. I've also made some bracelets with the Shaggy Loops pattern, the European 4-in-4, and the Persian box weave.

Basically, lots of fun. These are my favorite bracelets to make and to wear. ^_^ I'll photograph them properly later!

Behind the bracelets are some guitar string earrings.


Earrings! These are all on a display that I made all on my own with some scrap wood. I'll take some pictures of my displays this weekend and write up a blog post with tips and tricks later!
One of many necklaces made with my favorite beads ever-- the Czech glass pressed into leaves!


Also hard at work on two of Aurora's crowns!
I made Evenstar sets in every single color I could get my hands on.

The teacup is there because of Tea Trolling. :)

My brother kept pestering me to upload pictures to Instagram the moment I created an account, and I couldn't find anything to post except for the teacup I was drinking out of at the time. So I spammed him with funny pictures of tea or just the teacup in different places. ^_^ If anyone else likes taking funny pictures of tea, use the hashtag #teatrolling. 'Tis fun. Especially when you have little brothers who call tea "dirt water." Tea trolling rankles them. (I'm such a lovely big sister.)

I'm off to go write some essays, drink some tea, and put the finishing touches on the displays! What are you all up to this evening?

16 April 2013

DIY Book Box {Tutorial}


Secret book boxes. These are the stuff of old whodunits, with cursed and precious jewels hiding in the library of mysterious mansions. The only word to describe it is cool.

I've tried my hand three times in the past at making book boxes in the past. At first, I simply used an x-acto knife to cut out hundreds of individual pages. I did a tutorial for it and everything, but it is a very time consuming process and your hands get really tired.

Last year I attacked a book with power tools, and learned what not to do! Don't worry, though. I just helped a friend make her own book box and now I can (finally) show you how to make a nice book box using a drill, two screws, a scrollsaw, and some glue!

The project takes around half an hour to complete, but you'll want to let it dry overnight.


Begin by taking a destroyable book. What is a destroyable book? Something like a Reader's Digest Abriged book, which has a beautiful cover but it generally rubbish inside.

Do NOT destroy good books. You'll make bibliophiles like me die a little inside. ;)


Fold back the cover and a few pages from the front and back of the book.


This next step is very important-- if you forgo it, you'll ruin the book box. Sandwich the book between two pieces of wood and screw two screws through it.


Make sure everything is very snug.


Next, trace the edges of the book on the wood and draw the design you'd like to cut out. We chose a rectangle with rounded corners. Be sure to leave at least a half-inch border around the design.

It's difficult to twist a scrollsaw to make sharp edges, and even the curves we worked with were sideloading the blade. If you would like to make a straight rectangle, I'd recommend drilling holes at each corner. This gives the blade enough room to wiggle so that you can cut ninety-degree corners.

Drill a hole all the way through the book, push the blade through it, and set up your scrollsaw:


Then, DESTROY THAT BOOK!


When you are finished, you'll have a nice block of paper left. These book guts are lots of fun. You can use the paper for origami, artwork, and even costumes!


Next, do a victory dance because IT WORKED! :D


The book will feel very smooth where you cut it. You are done hollowing it out at this point, but it doesn't work all that well as a box because the pages can be opened.


Paint the insides of the box with glue. This will make your box sturdy but let it look like a very normal book from the outside.

(This is different from the technique that I did with my previous book boxes, when I glued the outsides of the pages shut. If you are sure to sandwhich the book between the pieces of wood, you won't need the extra stability that gluing the outside of the book shut gives.)


Glue a piece of decorative paper or fabric on the first non-cut page at the back of the book.

Now, set a nice heavy dictionary on top of the book and let it dry flat and even.


This would make a really cool afternoon project! It takes around half and hour and only requires a basic knowledge of how to use a drill and scrollsaw. My book box is the perfect place to hide candy from little siblings, and my little sister keeps her favorite pieces of jewelry inside of hers. I've seen some neat pictures of people putting engagement rings inside of book boxes or hiding ipods and other valuables in  hollowed textbooks inside backpacks.


12 April 2013

Happy Easter

I recently started a job and have been very busy finishing my senior year of high school in addition to working on Shoppe orders, so blog posts are going to be sporadic until the end of May. Today I went to put together a post and discovered that this one-- which was supposed to go up EASTER MONDAY-- didn't actually publish and instead saved as a draft. I don't EVEN know how I overlooked that. Oh, well. Happy late Easter Monday. Here's some eggs to look at.


Happy Easter, everyone!


Do you remember the Sharpie Easter Eggs I made last year? I'd experimented with Sharpies to try to copy the traditional Ukrainian eggs but discovered that it was really hard to do. Sharpies are great for drawing on eggs, but the neat geometric patterns are difficult to copy without using the beeswax and dye technique.


And guess what??? My parents bought us a pysanky set this year! Here's a collection of (most of) the eggs I've decorated in the past couple of weeks. The pictures are blurry because I didn't grab a tripod-- I was in a rush to take pictures before putting the eggs into little boxes to give to friends and family!


We got a neat egg-blowing tool which only makes one hole and does not require killing your cheeks and lungs in order to squirt the insides out. It's a nice little pump that creates a vaccum and will both empty and clean an egg in about two minutes.


Ukrainian eggs are a lot more complicated and time-instensive than I had anticipated! (Which of course just means that I am more obsessed with it than I would have been, because it's a nice challenge.) We boiled dyes and put them into mason jars. You take a cleaned egg, write on it with melted beeswax using a kitska wherever you want white, dye it in yellow, write with beeswax, dye it in the next darkest color, etc.


Our favorite part? When the egg is completely decorated and covered with blackened beeswax, you hold it over a flame until all the wax melts. You get to play with fire, guys. This is the coolest thing since the invention of fire. If you aren't careful, you can even heat the egg up so much that it hurts your fingers and you drop it!

click to enlarge
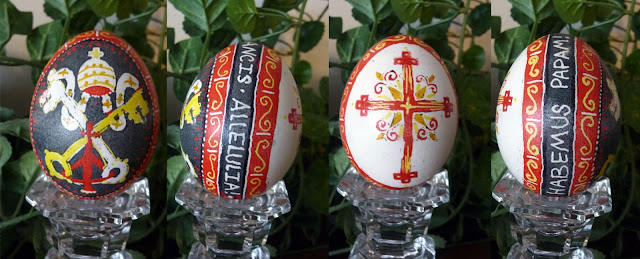
The kit arrived the same day that Pope Francis was elected! This was my second-ever egg made using this technique. The front has a slightly messy version of the papal seal, the back has a cross, and the sides say "Habemus Papam - Francis - Allelulia."

(My first egg was awful and not worth photographing).


This one was actually a lot cooler in real life. I soaked the egg in vinegar for a few minutes after making it a deep blue, and the top layer of dye (or of the egg itself, I'm not sure) rubbed right off with a paper towel. It made a messy, faded look. I've heard you can also dye eggs in bleach to go back to white-- this is how you get white backgrounds. It would be sooo much easier than trying to cover large swatches with wax.


Ta-da! Ukrainian eggs are so much fun, but as you can see I both have little time and little patience, so I gravitated towards making lots of simpler designs. I'm in complete awe of true pysanky eggs!

Oh, and I didn't spend all my egg decorating time using dyes. There aren't any cool religious icon eggs this year, but I did make this:

Frodo Baggins LOTR sharpie easter egg

  • bgbgb