Hi! I'm Rosemary and today I'm doing a little guest post about a party I planned for my little sister. Since some books were destroyed in the process, I thought it would be ideal for a guest post on Shaylynn's blog!
 My little sister was having trouble choosing a theme for her 12th birthday party and I suggested she choose one of her favorite things–books! She loved the idea and we had a ton of fun planning it together. AND, her friends loved it too! So here are some ideas and things that we did, and hopefully you can use them to throw your own book themed bash! :)
(Forgive the lack of nice photos! They're all taken on different cameras by different people. I wasn't really planning on doing anything with them so they're not the nicest!)
Invitations:
Here is where the book destruction begins! These invitations are very simple, but perfect for the theme. All you need is an old book, paper, a card, and some kind of adhesive. I didn't take any photos before we gave them out so these photos are of a quick recreation.
1. Get out your old paperbacks! I knew the moment we decided on the theme that old book pages would be the star of the party. I got out some of my 10¢ paperbacks (sometimes it pays to be a book hoarder) and got snipping.
2. Take a card or fold some pretty cardstock into a card (great way to follow a color theme). Write whatever you'd like on the front, as long as it resembles a title (feel free to print things from the computer or stamp them for a more professional look).
3. Cut out some rectangles from the old book to be the "pages." Adhere on to each side of the book.
4. Cut out a smaller rectangle, write your invitation info on it, and adhere to the center of the "page" (I like it to be slightly framed by the words). You have an invitation that looks like the book!
Decor:
Three words: DESTROY MORE BOOKS.The first thing we knew we needed was a bunting (we're Pinterest addicts, what can I say). We experimented with different shapes and decided we liked hearts the best. The rest was very simple. For the bunting we made a small cut on the each side of the heart and then threaded yarn through them all. Like I said, very simple, but you will probably spend a long time cutting out hearts! We made a bunting for the entrance and the dining room, and some little streamers to hang from the chandelier. You could carry the decor father than we did and set up old pretty books around the room or make some kind of centerpiece!
Refreshments:
We needed a couple book themed ones, of course! Some of our ideas were colored Goldfish (for
One Fish, Two Fish, Red Fish, Blue Fish), "Ambrosia squares" (from
Percy Jackson), and of course the
Harry Potter series is never ending supply of treats to try to recreate! We were also lucky enough to find a package of Turkish Delight at TJ Maxx! No need to mention what book that is from! :)
I attempted to make a cake that looked like a book, but I was not satisfied with my efforts. If you're good with fondant, I think little fondant books on top of cupcakes would be adorable!
Games:
The first game we planned was to have people guess what book characters everyone else was. I wish I could show you a photo of all the girls in their amazing costumes! We had Harry Potter characters, Hunger Games characters, and even someone from Les Miserables! (I was Mary Lennox from
The Secret Garden.) If your characters are too obscure, feel free to skip this game!
I wanted to do a classic "pin the blank on the blank" game so I made this one kind of sneakily to surprise my little sister. Pin the Title on Bella's Book! I actually drew my sister, but you can feel free to draw a generic person, a character, a stick figure, or even use a photo! Just have them holding a book! I then cut out some rectangles with the titles of Bella's favorite books on them. You probably already know how to play: the player is blindfolded, handed a "tail" with a piece of tape attached to it, spun a little bit, and then tried to "pin" the title onto the front of the book. I was thought it was fun waiting to see what Bella would be reading! :)


"The Line game" is one we learned in an acting group and play at almost every gathering. You and a partner have to act out a dramatic scene (you're sinking on the Titanic, you're trapped in a haunted house, etc.) but you both have a little piece of paper with a random line on it that you must read and incorporate into the scene at some point. It can be hilarious! To make this part of the book theme we used lines from our favorite books ("For Narnia! And for Aslan!" "There's a goat in the shower!").
It takes awhile to think of enough quotes to play for a long time, so start making the list a couple days before. The cut them all into separate slips, fold them, and put them in a box. Have everyone pair up (or split into groups of threes). When a pair is ready to play, give them their lines and their scenario (those can also be thought up ahead of time and can be from books!). Watch the story that unfolds!
This we made up specifically for the party! Everyone gets to design a book cover, and then the other player choose whose they like best by "buying" the book with play money!
You'll need drawing utensils (markers, crayons, pencils), small sheets of paper (we used normal 9x11 printer paper cut in half), play money for everyone (just steal it from Monopoly), a timer, and a list of goofy titles (Pippy and the Mountain Goat Choir, The Unexpected Cow, etc. It's good to think of these ahead of time!).
Make sure to tell all the players that it's about creativity, not how well you can draw. Encourage them to interpret the title anyway they want!
Each person gets a piece of paper and then everyone is told the title. Everyone has 5 minutes to draw a cover. When the timer goes off they each show their cover. Then the players walk around with their play money and "buy" the cover (or covers if you don't want to be too competitive) they like best! The player with the most money at the end of the round and/or game wins! You can play this as many times as you want/have titles for!
Another thing that would be fun (and you can use up more old book pages on!) is "newspaper blackout poetry." You take a page and black out all but the words you want to keep, making a really interesting piece of art (you can look here for some examples:
http://newspaperblackout.com/).
Treat bags:
According to my little sister, treat bags are the best part of every party. She has very high standards for them, so it's a big deal that she was happy with these!
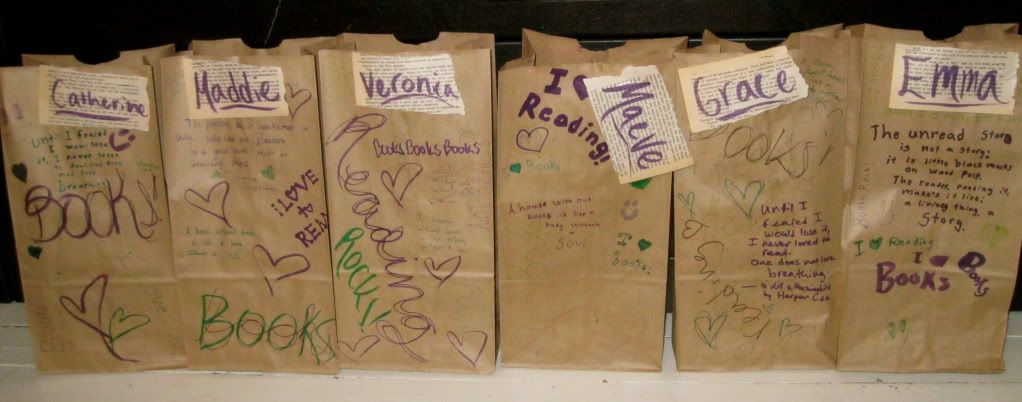
We decorated each bag with quotes about reading and wrote the guest's name on a piece of book-page. Inside the treat bag is:
A packet of bookworms
We bought a big bag of sour gummy worms and split them into small ziploc snack bags. Then we took a piece of paper, folded it over the top, stapled it, and labeled it Bookworms! It's cuter AND cheaper than buying a pack of separately packaged gummy worms.
Harry Potter lollipops
We were lucky enough to come across a bag of fizzy lollipops and immediately thought "Acid pops!" They're mentioned briefly in Harry Potter, but it was enough for us! We copied the Honeydukes colors and stapled labels onto the stick. You could also print out the Honeydukes logo from the computer and use that!
Wonka candies
Available at almost any store and book related by their very nature!
Little notebooks
We bought a pack of mini composition notebooks and then decorated them with pretty scrapbooking papers and little book page hearts!
Each treat bag also contained two books! We got a bunch of gently used books at a used book store and matched them up to who we thought would like them best.
If you want to add more, there are lots of ways to recreate book themed candy! :)
I'll end with some quick tips for using old book pages:
1. If you don't have any old paperbacks don't fret, they're easy to find. Simply go to your nearest used bookstore or thrift store and find the paperbacks and/or clearance section. You should be able to get a couple paperback classics for under a dollar. If you must you can use a dictionary.
2. It doesn't matter much what the book is about or what the page says, seeing as no one will be able to read very much of it. It can be fun to use a book everyone will recognize (Pride & Prejudice or Narnia for example). Or you can make the words almost completely decorative by using something more obscure (I used Pride & Prejudice for the invites and Villette for the decorations).
3. Keep an eye out for awkwardness. As long as your book is family friendly you shouldn't have to worry too much, but keep an eye out for awkward formations of words and stuff. It doesn't matter so much for the bunting, but for the little notebooks you definitely want to be aware of what the hearts say. . . . Fine! If you really need an example I'll give you one. I was showing my mom the little notebooks and she laughed and pointed out that one of the hearts said "she scratched" and the line below said "her seat." See, nothing scarring or anything, just awkward. I put new hearts over top that one and was more careful to read what sentences they formed. :)
Hope this little post inspired you to throw your own book-themed party! :)