27 March 2012

Sharpie Easter Eggs


I'm sure you've seen pictures of those beautiful works of art known as Ukrainian Eggs (or perhaps you've been lucky enough to see them in person!). This traditional style of decorating eggs uses beeswax, candles, really really really strong dyes, and other materials that most people don't have on hand.

Those eggs are true works of art, though. I've always admired them. Last Holy Saturday, I decided to try my hand at blowing eggs and decorating them with various materials-- and I never got past the Sharpies.

Sharpies are awesome.

Sharpies are the ultimate quick-and-easy-(relatively-easy-that-is)-egg-decorating-tool-things.

And, for once in my life, I am actually being a good blogger. I did a craft before the date it's themed on. I've got a very bad habit of doing themed art the day of or even the day after holidays/events, and not posting the pictures and tutorials until a week or so later. (Bad habit if I wanted to be a rich and famous blogger. OK habit for a teenager who just loves art and sporadically posts on her blog for the heck of it.)

Last week, I pulled out the Sharpies and did some more experimenting! These turned out much better than last time-- and I really liked the ones I made last year.

The eggs are pictured below in the order that I made them. Right now, though, here's some tips:

  • When blowing the eggs, go ahead and make the bottom hole really big. (See below). This will keep you from getting dizzy when blowing it. Also, you might need to use tweezers to pull the membrane out of the hole; it likes to block the opening up and send raw egg up the end of the egg that your mouth is touching! BTW, I'm just using chicken eggs that we get from Costco.


  • You don't need a ton of Sharpies (I've spent a lot of money and have nearly 30 in different colors and sizes, but only use 3-4 markers per egg), but be sure you use real Sharpies. You don't want that half-permanent stuff to bleed all over the place.
  • Don't use a pencil to draw in your design, use a very pale marker. I use light pink and light green. The pencils will leave gray in your color.
  • Use a rubber band to draw straight lines.
  • Hold the egg with a kleenex or paper towel. The Sharpie takes awhile to "set," and nervous, focused fingers will get damp and bleed the color. (Ask me how I know...)
  • Blend and smear colors! The unique thing about using an egg is that the Sharpies stay liquid for a good 3 seconds. Use your fingers, a Q-tip, or a bit of Kleenex on your fingertip to smear the ink.
  • Sharpies pull each other up, even once the ink has dried. It's great for fixing problems, but be sure you do the dark colors last so you don't risk pulling dark brown into that light yellow you're coloring.
  • If you want to color in a large area, hold a Sharpie against a kleenex and let the ink bleed. You've got 15 seconds to rub that color in wherever you want. It leaves a pale and solid color and is great for "erasing" large areas of underdrawings.
  • If you really need to remove something, use fingernail polish remover on a q-tip (or something equally abrasive). It doesn't totally remove the color, but I had a major och-nee (oh-noes!) on one egg and this let me keep the background mostly white. I think it might weaken the eggshell, though.
  • Use thin wire to thread ribbon through the egg. Most needles aren't long enough. (None of that is pictured here).
  • Sharpies aren't toxic. I'm pretty sure you can safely use them on hardboiled eggs.
  • Be patient. I spent almost two hours per egg. Rushing things won't get you anywhere. Be sure and use lots of layering to get depth.
  • HAVE FUN! Because this technique is AWESOME AWESOME AWESOME and I love it and you'll love it and it's awesome. *emphathetic head nod*

Let the pictures commence!

First I did another egg very similar to last year's eggs. I forgot to snag close-up pictures of it, look for it in the bowl of eggs.


Madonna and Child

I was a little tired of boring old swirly designs and wanted to attempt something more religious. Because Easter eggs, after all, celebrate Easter, only the greatest day of the Church year!

I'm quite proud of this one. :) It's still my favorite!


The Resurrection

The first egg left me wanting to make more! I winged the first one, but for this egg I looked up some traditional iconography for the Resurrection and tried to incorporate it. This also includes my big artsy obsession, Celtic Knotwork.

You know, art is hard enough on a flat surface. Especially knotwork. Try throwing it on an irregular spherical shape... *head explodes*


The Crucifixion

It felt a little odd to do a Resurrection drawing during Lent, so I did one of the Crucifixion.

You can still see the underlying light-pink marker underneath the words. When I draw pictures, the underdrawing gets rubbed away, but it evidently doesn't work as well for lettering!


Our Lady of Guadalupe

Our Lady's picture is very graphic and perfect for copying onto an egg.

Of note on this egg is the rose. Originally my underdrawing had some heart-shaped design that is typical on Ukrainian eggs, but I didn't like it so I used a tissue to smear tan ink and "erase" it. Then I drew the rose on top with light pink, bright red, and dark brown. It took a lot of smearing.


My family isn't very artistic but three of my siblings joined in the fun. My sister's is pretty obvious, but I bet you'd have a hard time telling about the 4 and 11 year old boy's ones. *rolls eyes* My brothers are math and physics geniuses, not artists.


My 8 year old sister did this one entirely on her own. It's "Mary holding Baby Jesus and the back of the egg is the cross after they took Jesus down and you can still see his blood on the cross and on the ground." She then told me all about how Jesus' blood washes away our sins because He died to save us and all about how sad Mary was when her Son died.

She also told me that she wants to make a special egg to commemorate her First Holy Communion this spring. :)


I made these eggs early so they can be gifts for family and friends on Easter Sunday, but they are so so so much fun to make that I'll be making them through the rest of Lent, and probably during the whole of the Easter season. You'll be seeing a lot more of these around the blog!

I think my family likes the decorated eggs so much because it means that I'll offer to cook breakfasts of omlettes and scrambled eggs!

Did you make Sharpie-ified Easter eggs? I'd love to see them! Please leave a comment with a link to your blog or flickr or whatnot. If lots of people decorate eggs with this technique I might do a special post highlighting all of them. :)

25 March 2012

I'm Having a Wrist Party


Have you heard of wrist parties? I just found out about them from a fashion blog; they are what you call a wrist full of tons and tons of bracelets.


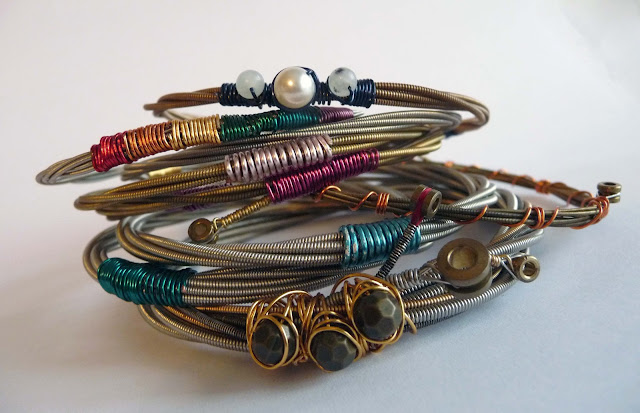
I decided to have a wrist party, too, and put on all some of the new bracelets I've made-- and they are all made with used guitar strings. :)

Have you done a wrist party recently? I think it's a really cute idea and would love to hear about your favorite "wrist party."


I try not to post about my Shoppe stuff all the time because I, at least, personally find it annoying when bloggers talk about nothing but the stuff you can buy from them.

But since this is the only way I'm currently making money, and since I've recently made a ton of jewelry and listed it on my online store... I have an announcement: You can buy these!

Go check out my Shoppe! Over the past two weeks I've slaved away and have listed 40 new items (WHEW. Listing the jewelry takes almost as much energy as making it!).

I won't post them all here right now, but in addition to guitar string necklaces, earrings, bracelets, bangles, and rings, there are some Elven jewels, a medieval circlet, custom rings, and more. The guitar string jewelry can be found under the "Novelty" tab, alongside steampunk and other geekery.


Oh, yeah, I'm also having a FINGER PARTY, baby! *cue the rock music, because wearing lots of bangles and rings makes me feel uncharacteristically like a rock star*

(No, I've no idea whether finger parties are a thing. If they aren't, I just invented them.)

23 March 2012

Bookish Adventures {part two}


into the woods

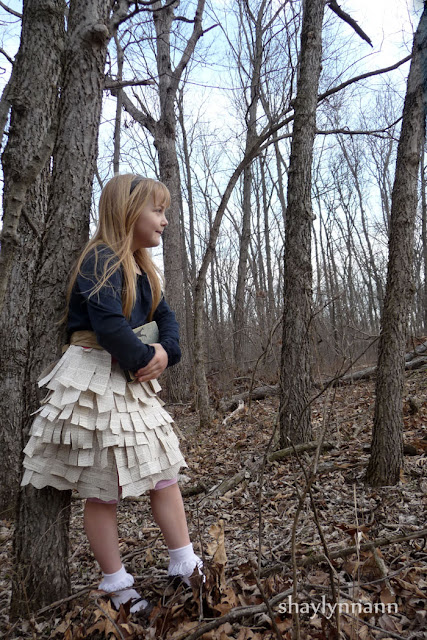
She wore a skirt made of stories and I wore a camera strap. Together, we traveled to our favorite haunt: the magical forest on the borders of our neighborhood.


As usual, click each photo to see it larger and on a dark background.

(As I'm trying to improve my photography skills... which pose/editing do you like best?)

{part of my destroyable books blog series}


18 March 2012

5 Pieces from Art Class

Happy St. Patrick's Day! I know I should probably have made some little Irish craft... or at least drawn some new celtic knotwork, considering that that is my latest obsession, but I didn't. So if you want something nice and St. Patrick's-y, go look at my big calligraphy project from awhile back.

I started my first ever true art lessons this past fall. Each week we work with specific mediums or styles, but other than that my teacher pretty much gives me free reign (although the moment I ask for help she always has some good critiques!). I finally have a dedicated hour each week for art-- a lifesaver for a busy teen!-- and have really been stretched with these new challenges.

 Here are some projects from the last several months: 


A scratchboard of Aslan. This was really fun, and I love the final effect. The particular scratchboards we used are metallic paper ones, and unless you find the "perfect" angle of light (like I did for these photos) you can only see part of the image at any time.


Scratchboard is basically a technique where you scrape off an ink or paint to reveal the paper underneath. I'm going to make some of my own using gesso and india ink this week. :)


Pointillism. Lots of dots. Way too many dots, and a pen that blotted all over the place. I wound up coloring it in with black watercolors. I wasn't too thrilled about the technique (I am not patient about this sort of thing), but once we put the picture in an old mat I thought it looked somewhat pretty.


Paint in general is still relatively new to me. This is a watercolor painting of two eyes, done in two hours. Once upon a time I was wonderful at realism... I need to get back to it. These eyes just wouldn't cooperate.


But when you aren't trying to be realistic, it doesn't matter if the eye is funky. This is something I would have never attempted on my own, and while I still think it's weird, I'm glad we did it in class. Because weird doesn't always have to be bad, and it's SO MUCH FUN to splash paint on paper and just watch it splatter. It's the same joy you get when knocking over a tower of blocks. 


Another watercolor, from my imagination and built out of memories of the climbing tree at our old house. This is Robin Hood and Maid Marian in what is supposed to be an Arthur-Rackham inspired style. 

Sneak peeks at two unfinished projects


An oil painting. I started it in class way back in November, making it my second oil painting. However, I was being too nitpicky and decided that I wanted to continue working on it. By the time it's done (hopefully this week), it will be my fourth finished oil painting. 


Linoleum block printing. Let's just say that this is the coolest technique EVER. Unfortunately I left my good prints at art class and won't get them back for two weeks, so you'll have to wait until then to see how it turned out. (It turned out awesome!).

(linking up at Sunday Sketches)

14 March 2012

Bookish Adventures {part one}


Books come to life in your imagination. The stories become a part of you, shaping your view of the world and occasionally making you stand on your head in order to see that your life is not, in fact, mundance and prosaic.

One March dawn, my (very patient) little sister and I journeyed throughout our neighborhood and turned it into our own little Wonderland. Several days before, I had made a secret book box using an unloved Reader's Digest Condensed Book. We used the cut-up pages to create a paper skirt and ran outside before schooltime to do my first "artsy photoshoot."

My point-and-shoot isn't the most reliable when it comes to taking good photos, and I snapped away until my memory card held over three hundred pictures. As it turned out, most of the photos were good, and I loved so many that I'm going to have to split up the photos into several different posts. This is Part One of our Bookish Adventures photoshoot, all taken in a lovely little field. Over the next week or two, I'll post photos from the woods and the creek.

Click on each picture to see a slightly larger version against a black background (the pictures look so much nicer that way!).


{ part of my destroyable books blog series}

12 March 2012

On the To-Do List


I found these pictures in a folder from last summer. Almost an entire year ago.


I was experimenting with making ear cuffs-- I probably made a good twenty different prototypes. That summer was pretty awkward for my friends, because immediately after saying "Hi!" I would stare intently at their ears. Anyone who visited me was forced to try an ear cuff on to see if such-and-such design would comfortably fit her ear.

The majority of my friends don't have peirced ears, and they went along with my eccentric idea patiently. Ear cuffs are a super-cute option for people who don't have piercings.
I actually discovered that I had posted about ear cuffs some three years ago, right at the beginning of this blog (ohmygoodness, I can't believe it's been three years... I was around 14 when I started this blog!!!). You can see it HERE.


I came up with four different ways of making ear adjustable ear cuffs. I even took photos for a tutorial. Most unfortunately, the majority of these pictures won't open; the files are corrupted.

BTW, I was first introduced to the idea of ear cuffs by Thyme2Dream, a lovely shop that sells all sorts of fairytale jewelry.

This is the most complicated ear cuff I made. I was so incredibly proud of this design. It was created to go with my Elven costume. Elf ears! With no weird latex or plastic or "ear sleeves!" Just wire and beads an TONS of patience and experimentation.

Imagine my dismay when I saw a similar design on Pinterest last week. Someone else had my lovely idea and actually did something with it, rather than letting the prototype gather dust and the pictures sit buried on a harddrive. Oh well, good for them.

Anyway, I obviously never went anywhere with the ear cuffs. But I plan to. Right now I'm insanely busy with tons of other projects, but as soon as I have time I plan on making bunches of these to put on my Shoppe... and I'll probaby make tutorials for y'all, too. :)

08 March 2012

Paper Feather


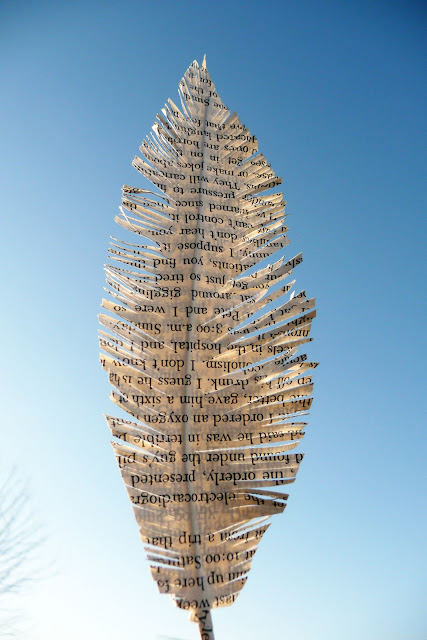
A quick little feather made from book pages a few weekends ago. A pointless but pretty project (although I'm going to use it on a birthday card soon, so it's not completely pointless!)


  • bgbgb