13 May 2011

Fake Wrought Iron Art

I love wrought iron art. The richness of the metal, the character of the forging, and the Art-Noveau-ish-ness of the designs are very beautiful.

Unfortunately, wrought iron kind of costs money. Imagine my amazement (and my why didn't I think of that?!) when I saw Suzy's Faux Wrought Iron Tutorial.

I knew I had to make this project for my bedroom. (I'm decorating with DIY projects). I actually made this project nearly two months ago, but kind of forgot to share it with ya'll... (ooops).


I collected bunches of paper towel rolls and a Cherrios box.


(Yes, when you live in a big family you can collect that many toilet paper rolls in just a few weeks. And you tend to get huge boxes of cereal.).

Are you familiar with the art of quilling? It consists of rolling thin paper strips into various designs and glueing them together.

The genius of the project is quilling toilet paper rolls! Just wrap the cardboard around a pencil... glue (I used ModPodge), and use clothespins to keep the design in shape while drying. (use wax paper behind your project to keep the glue from sticking to your work surface).


Suzy used wood for the outside frame, but I didn't have wood... so I made a frame out of a Cheerios box instead!

The hardest part was making all the components match. Do you know how hard it is to make the exact same swirl, 15 times over?


The last step is spray painting! FUN. This was my first time spray painting (I used paint left over from m brothers' Boy Scout Pinewood Derby. With my brothers, you have to have black paint for homemade speed cars).

click to enlarge


I stuck 3 sewing pins in the wall and hung my artwork from that.


click to enlarge


Is it pretty or what? I might put more scrollwork ontop of the rectangle eventually.


linking up { here }

08 May 2011

Delightful Desk


 Remember how I said I was going to decorate my room... in a totally cool, mostly DIY, and very cheap sort of way?

 Nothing is easier and cheaper than scrapbook paper! Read on...


This was my desk on an ordinary day. 


We found these beautiful little cork board squares at Staples-- I think we spent $15, and there are more squares than what I hung up.

(Yes, those are roses hanging from my ceiling. Hey, I like to dry flowers!)


Want to add a splash of color? Change your room's look in just a couple of minutes!

All you have to do is pin up some scrapbook paper!


 Viloa! I just used the paper I had on hand. It went beautifully with my "color scheme." You can pin directly onto the paper.

 I wound up taking this down because I actually had plans for most of that paper. :)


AND NOW.... my favorite part of the desk design! 

I made a fun little topper for my rather boring cork board rectangle.

Gathering pretty papers...
This post on Vintage Wanna Bee's blog inspired me. I followed the tutorial for round paper fans.
It's actually really easy: just take 2 pieces of matching scrapbook paper, accordion fold, and then glue together.


I made several in different sizes and colors. I even used old book pages from one of those ruined paperbacks! 

Sticking the fans onto the wall proved to be a bit of a problem. What with all the folding, there was no where for tape to go! Obviously I can't damage the walls or the paint, so it took a bit of thinking to find a solution.

I wound up putting half pieces of 3M wall stickies on the wall. On top of these I used some really thick, puffy glue dots. Next, I pressed the paper fans onto the glue dots. I've had two fall down, but all I had to do was gently push them against the glue dot again and they were OK.


Of course, I HAD to add a cute little quote. (You know me and my thing with quotes!). This one is supposedly from Albert Einstein. I built the graphic myself, printed it out on card stock, and then tore the edges for a rough look.

"A clean desk is the sign of an empty mind..." my ultimate excuse for not cleaning my desk!

click to enlarge
 Here you can see the finished project: I added some paper cutouts to the middles of the bigger paper fans. (Scalloped book pages with small circles of scrapbook pages glued in).
Now my desk is nice and fancy. :) I love this craft. It is so easy to do and adds a touch of whimsy to my room!


My whimsical DIY desk decoration... on one of the few occasions that my room is actually clean!!!

This has been up in my room for several months now, and I'm going to help one of my friends make a bunch to hang above her bed!


Check out my other DIY decor posts {here}.

Did this inspire you to make some decorations of your own? Leave a comment! I am the Comment Monster. Please give me comments. Nom nom nom!

Linking up at these loverly blogs.

06 May 2011

Come, Holy Spirit


This is a pre-published post to let you know why there hasn't been a post recently.

TODAY IS MY CONFIRMATION!

Two of my brothers are also getting confirmed! :) Please pray for us!


(Regular post will resume in a couple of days)

04 May 2011

You Are AMAZING!


I'm so excited! I can barely believe it! I logged on today to see... 100 followers on my blogger dashboard!

Actually... 107, which is even more awesome!

It's amazing to think that 107 people are interested in the crazy craftiness and random creativeness of a 16 year old girl. I'm truly honored to have you reading my blog! :) Welcome, new readers!

I have lots of fun in store for you. Longtime readers know that blogging was slow over the last couple of months because I cut back on computer time for Lent. In that time, though, I got many crafty projects finished (everything from room decorating to jewelry to secret boxes...). The next few months will be crazy cool. ^_^

The Faerie and I just wanted to make a quick appearance and say thank you! Thank you for reading the blog, and thank you for being as awesome as you are!

Always remember... I love love love love comments! See the little "leave a note" link at the bottom of this post? It should be your best friend. ^_^

*goes off dancing and singing and running and jumping and flying... and then settles down to write an essay*

03 May 2011

Wirewrapped Rosette Ring { Tutorial }

Have you ever wondered how to make a beautiful ring... all by yourself?

I finally edited and uploaded the long promised Ring Tutorial!

This video (6 minutes long) teaches you how to make Wirewrapped Rosette/Knot/Spiral rings.

You will need:
  • pliers
  • a mandrel or thick marker
  • wire (copper is the easiest to work with)

Enjoy! I hope this helps you make some of your own rings! Don't worry if you don't get the hang of it right away. It takes a lot of practice.


By the way... that ring I mentioned wearing continuously for 2 weeks? I've been wearing it now for a month (in place of my purity ring, which we need to get fixed). This includes wearing it when washing hands, etc. It hasn't faded or weakened or lost it's shape.
(Update: See this same ring, 6 months later!)


My post on handmade wire rings was quite popular, so I decided to just go and fix that darn Windows Movie Maker and get the video up and running as quickly as possible!

This is just the first in a series of videos. Over the next couple of weeks, keep an eye out for video tutorials on these ring styles:

UPDATE: Videos finished, here they are:


Did you make a ring using this tutorial? Please share your projects, questions, and tips in the comment box! :)

As usual, linking up at these blog parties.

02 May 2011

Quotey!!! Would you be interested?

I'm thinking of starting a blog party featuring... quotes!

Would you be interested?

I've wanted to start a blog hop for awhile now, but am aware that my readers have all sorts of interests. Plus, there are already so many art/craft/writing specific blog hops out there.

This linky would allow you to share your own interests... you'll just have to be creative and use a quote! Anything will go... photography, calligraphy, art, crafts, or even writing about what a quote means to you. The only rule would be that it is made by you!

Sound interesting? Leave a comment here on the Faerie blog!

28 April 2011

Sharpies and Eggs


I've always loved Urkrainian eggs. A few weeks ago, Suzy'sSitcom blog featured some Ukrainian eggs and got my wheels turning...

Traditional eggs are made with a pysanky set, using beeswax, toxic dyes, and several hours per egg. I didn't have any of those.

So I improvised.

(I like improvising, don't I?)

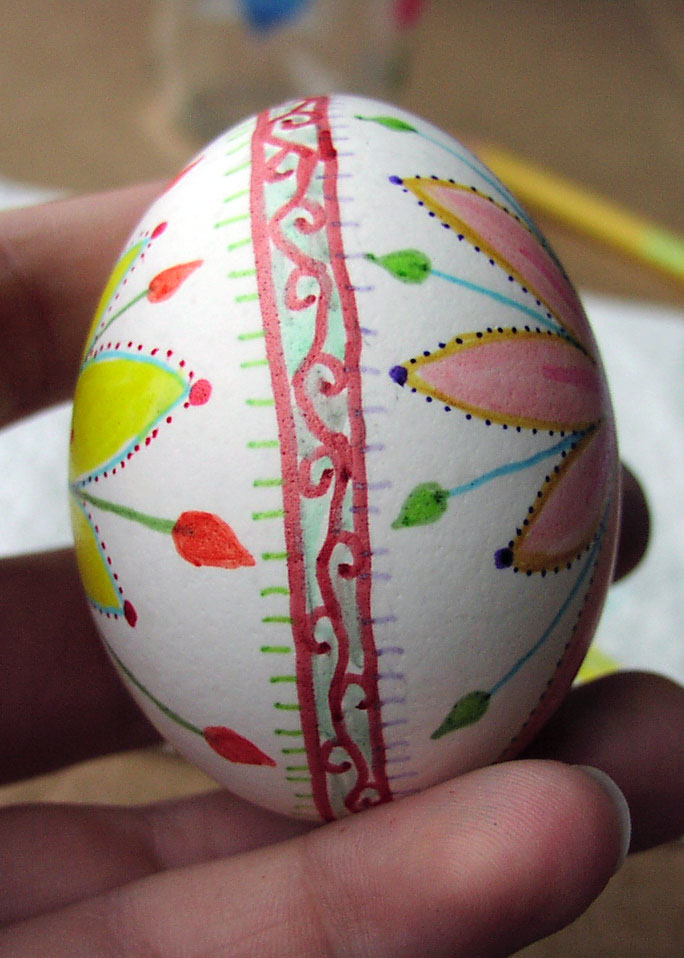
And I found the easiest way ever to decorate Easter eggs with intricate designs.


Behold, the supplies I found! Acrylic paints, small brushes, and.... Sharpies. I saw a big box of multi-colored sharpies sitting on the school table (my mom has a thing with pens), and grabbed them.

I didn't use the acrylic paints at all. Sharpies are the ultimate egg-decorating-tool-cheats.

Addie blowing an egg-- actually, attempting to, because she couldn't do it.
The first step is blowing the egg. This is the grossest and possibly most confounding part of my "Ukrainian" eggs.

You use a thick needle to gently poke a hole in the top and bottom of the egg. Wiggle it around so that the bottom hole is thicker, about the width of a #2 pencil lead. Use the needle to stir up the yolk.

Then blow through the smaller, top hole. Blow until you are red in the face. Roll your eyes when your brothers gleefully exclaim how disgusting it is.

You can use the egg insides to make scrambled eggs, or just toss it.

When the egg is empty, fill it up with water and vinegar. You can use the needle to hold the "film" away from the large bottom hole and use a faucet to fill the egg. We discovered that the best way to get a vinegar/water mixture into the egg is to use a medicine squinter (the kind you get for baby medicine). My friend said that a medical syringe would be even better.

Blow the water/vinegar out of the egg and get started decorating!


Draw the design in pencil (lightly).


Then, go CRAZY with the SHARPIES!


I spent almost an hour per egg, because I'm crazy like that. I get all caught up in art and get more and more and more and more detailed.


I didn't use any dye on my eggs before decorating them, but I did discover that Sharpies can make a very beautiful dye/marbled effect.

Scribble on a small portion of an egg with a Sharpie, then use the tip of a paper towel or a Q-tip to rub the ink around on the egg. Do it in sections so the ink can't dry until it has been marbled.

This egg was made by my friend. Didn't she do a beautiful job? She loves Asian culture, and the writing on the edges of her egg is copied from a Miraculous Medal my grandma gave me. I really want to learn the story behind the medal. It's really old and the writing is some kind of Asian language.


While I went crazy with Sharpies, my siblings dyed their hard-boiled eggs the "normal" way.


My brother saw that the Sharpies said "Non-Toxic," so he decided to draw on hard-boiled eggs with Sharpies. He made a Harry and a Voldemort. They had an epic battle at our breakfast table, and William had a wee bit too much fun squishing the yolk from Voldemort's egg to a pulp.

Next year, I'll try:
Dyeing the egg beforhand
Stringing string through the egg to make an ornament (I don't have a big enough needle now)

Painting eggs with acrylics

Or maybe I'll even be able to try real pysanky.


photo from Suzys Artsy Craftsy Sitcom

You know what? I only made four eggs. And the Easter seasons lasts a whole lot longer than just Easter Sunday. I might go and make some more... there's a whole world waiting inside of those eggs and Sharpies... So many new designs to discover...


  • bgbgb